-
摘要
在扫描相位测量轮廓术中,需要先将不同位置的物体匹配到同一点,再根据相移算法提取相位信息,而像素匹配精度与相移算法均会影响测量精度。为此,采用显微系统,根据其远心光路特性实现物体移动量与像素移动量的等量转换;通过交替采集白场图像和条纹图像,由白场图像通过光流法实现精确的像素匹配,再根据物体匀速运动特点实现条纹图像的精确像素匹配;根据初始条纹周期选择基本符合满周期的
N 幅条纹图,由任意步数相移方法计算出截断相位分布,再通过概率密度函数搜索最佳条纹周期,进而得到准确的相位信息,完成物体形貌测量。实验表明,所提方法有效提高了测量精度,相移算法也适用于任意N (N ≥3)幅图,在模拟工业流水线场景中物体的三维测量时,RMSE (均方根误差)可达0.008 mm左右。Abstract
In scanning PMP, it is essential to first match different positions of the object to the same point, and then extract phase information using phase-shifting algorithms. Both pixel-matching accuracy and phase-shifting algorithms influence measurement precision. To address this, a microscopic system is employed, leveraging its telecentric optical path characteristics to achieve equal conversion between object displacement and pixel displacement. By alternately capturing white-field and fringe images, precise pixel matching is realized through optical flow in the white-field images, followed by accurate pixel matching of the fringe images based on the object's uniform motion. A set of
N fringe images, closely matching a full cycle based on the initial fringe period, is selected to compute the truncated phase distribution using an arbitrary step phase-shifting method. The optimal fringe period is then identified through a probability density function, leading to the accurate extraction of phase information and the completion of the object morphology measurement. Experimental results demonstrate that the proposed method significantly enhances measurement accuracy, with the phase-shifting algorithm applying to anyN ≥3 images, making it particularly suitable for 3D measurements of objects in industrial production lines, achieving an RMSE measurement accuracy of about 0.008 mm. -
Overview
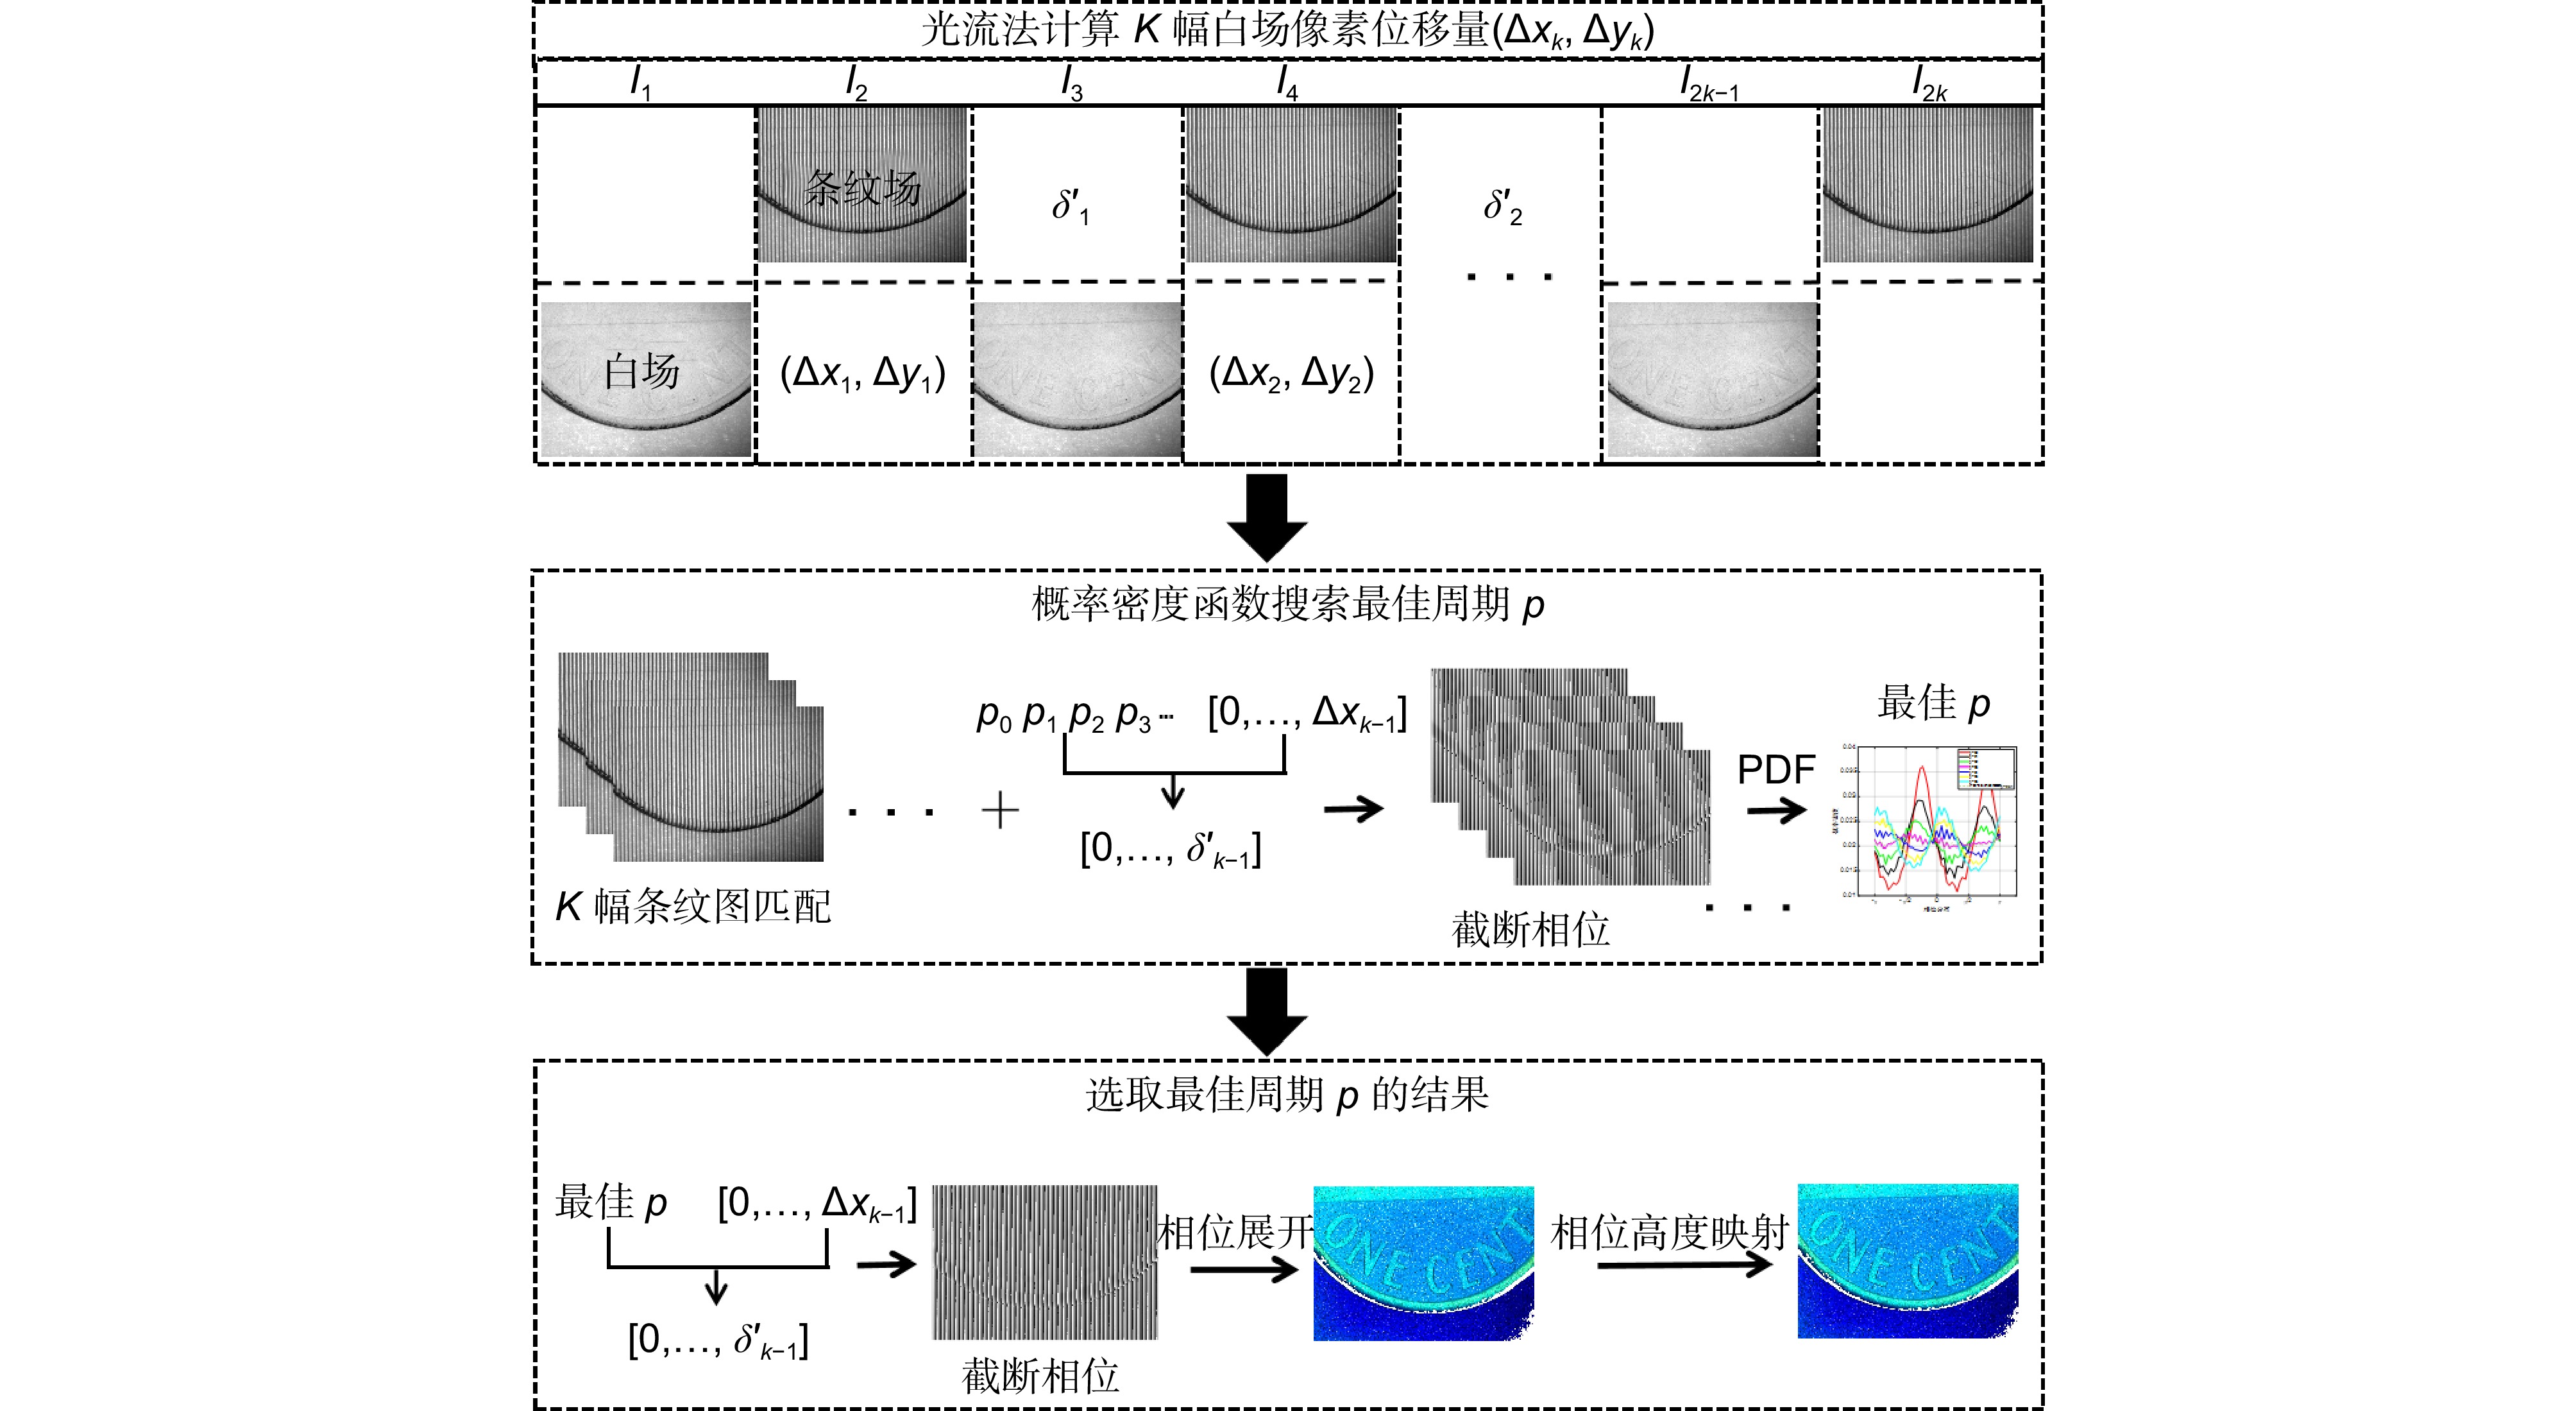
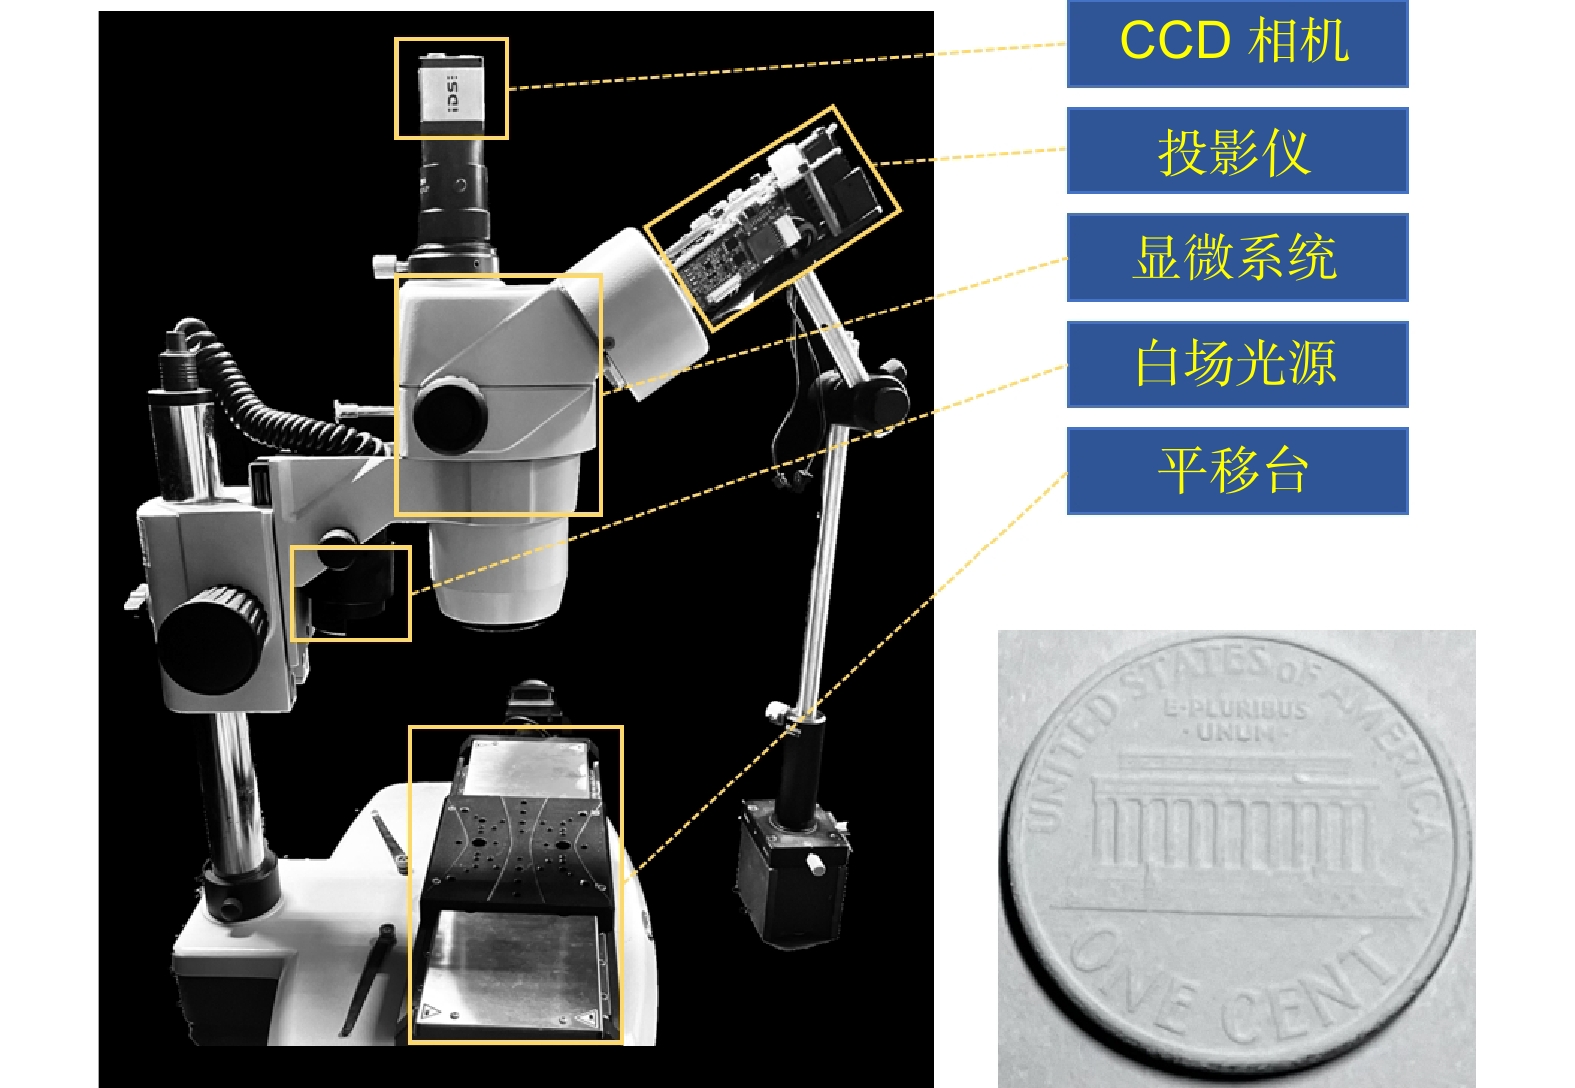
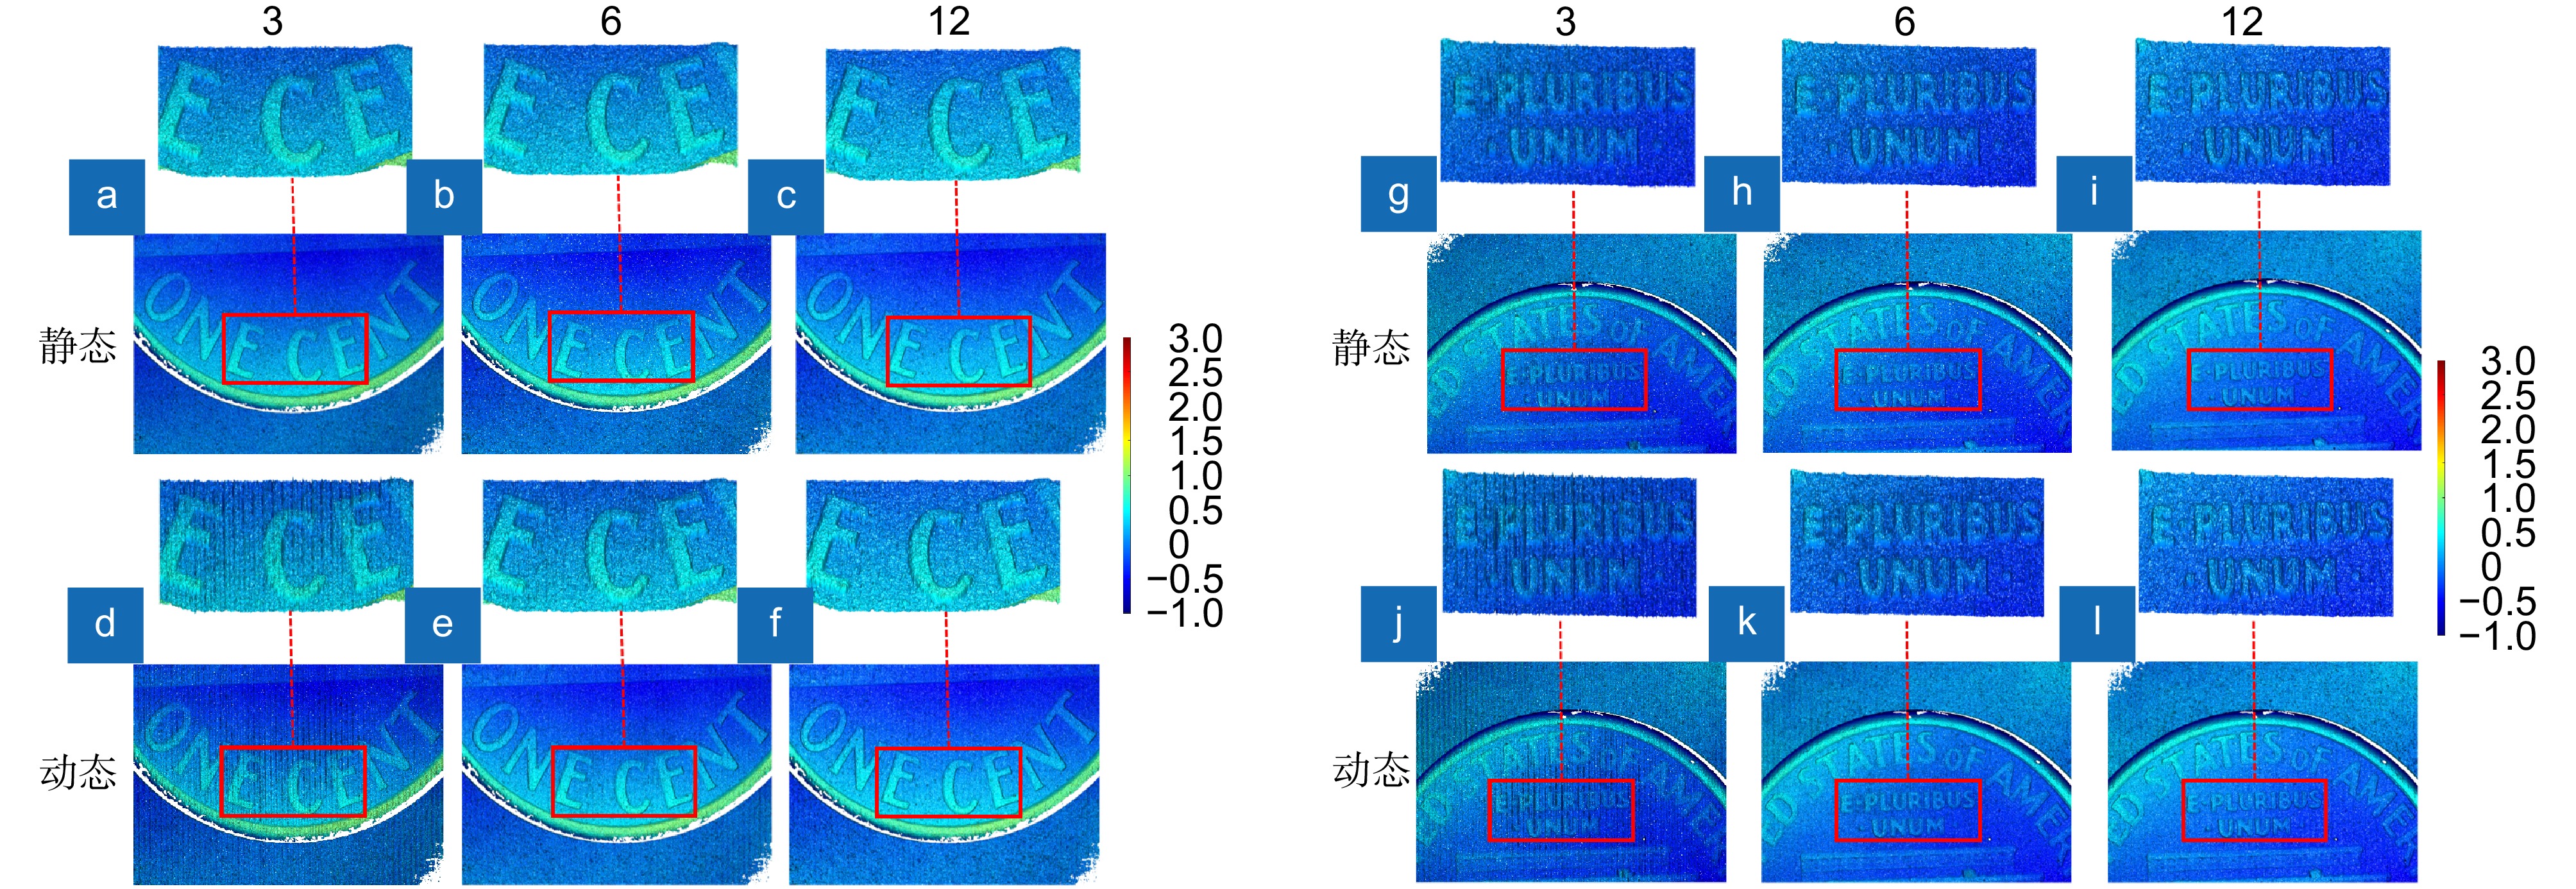
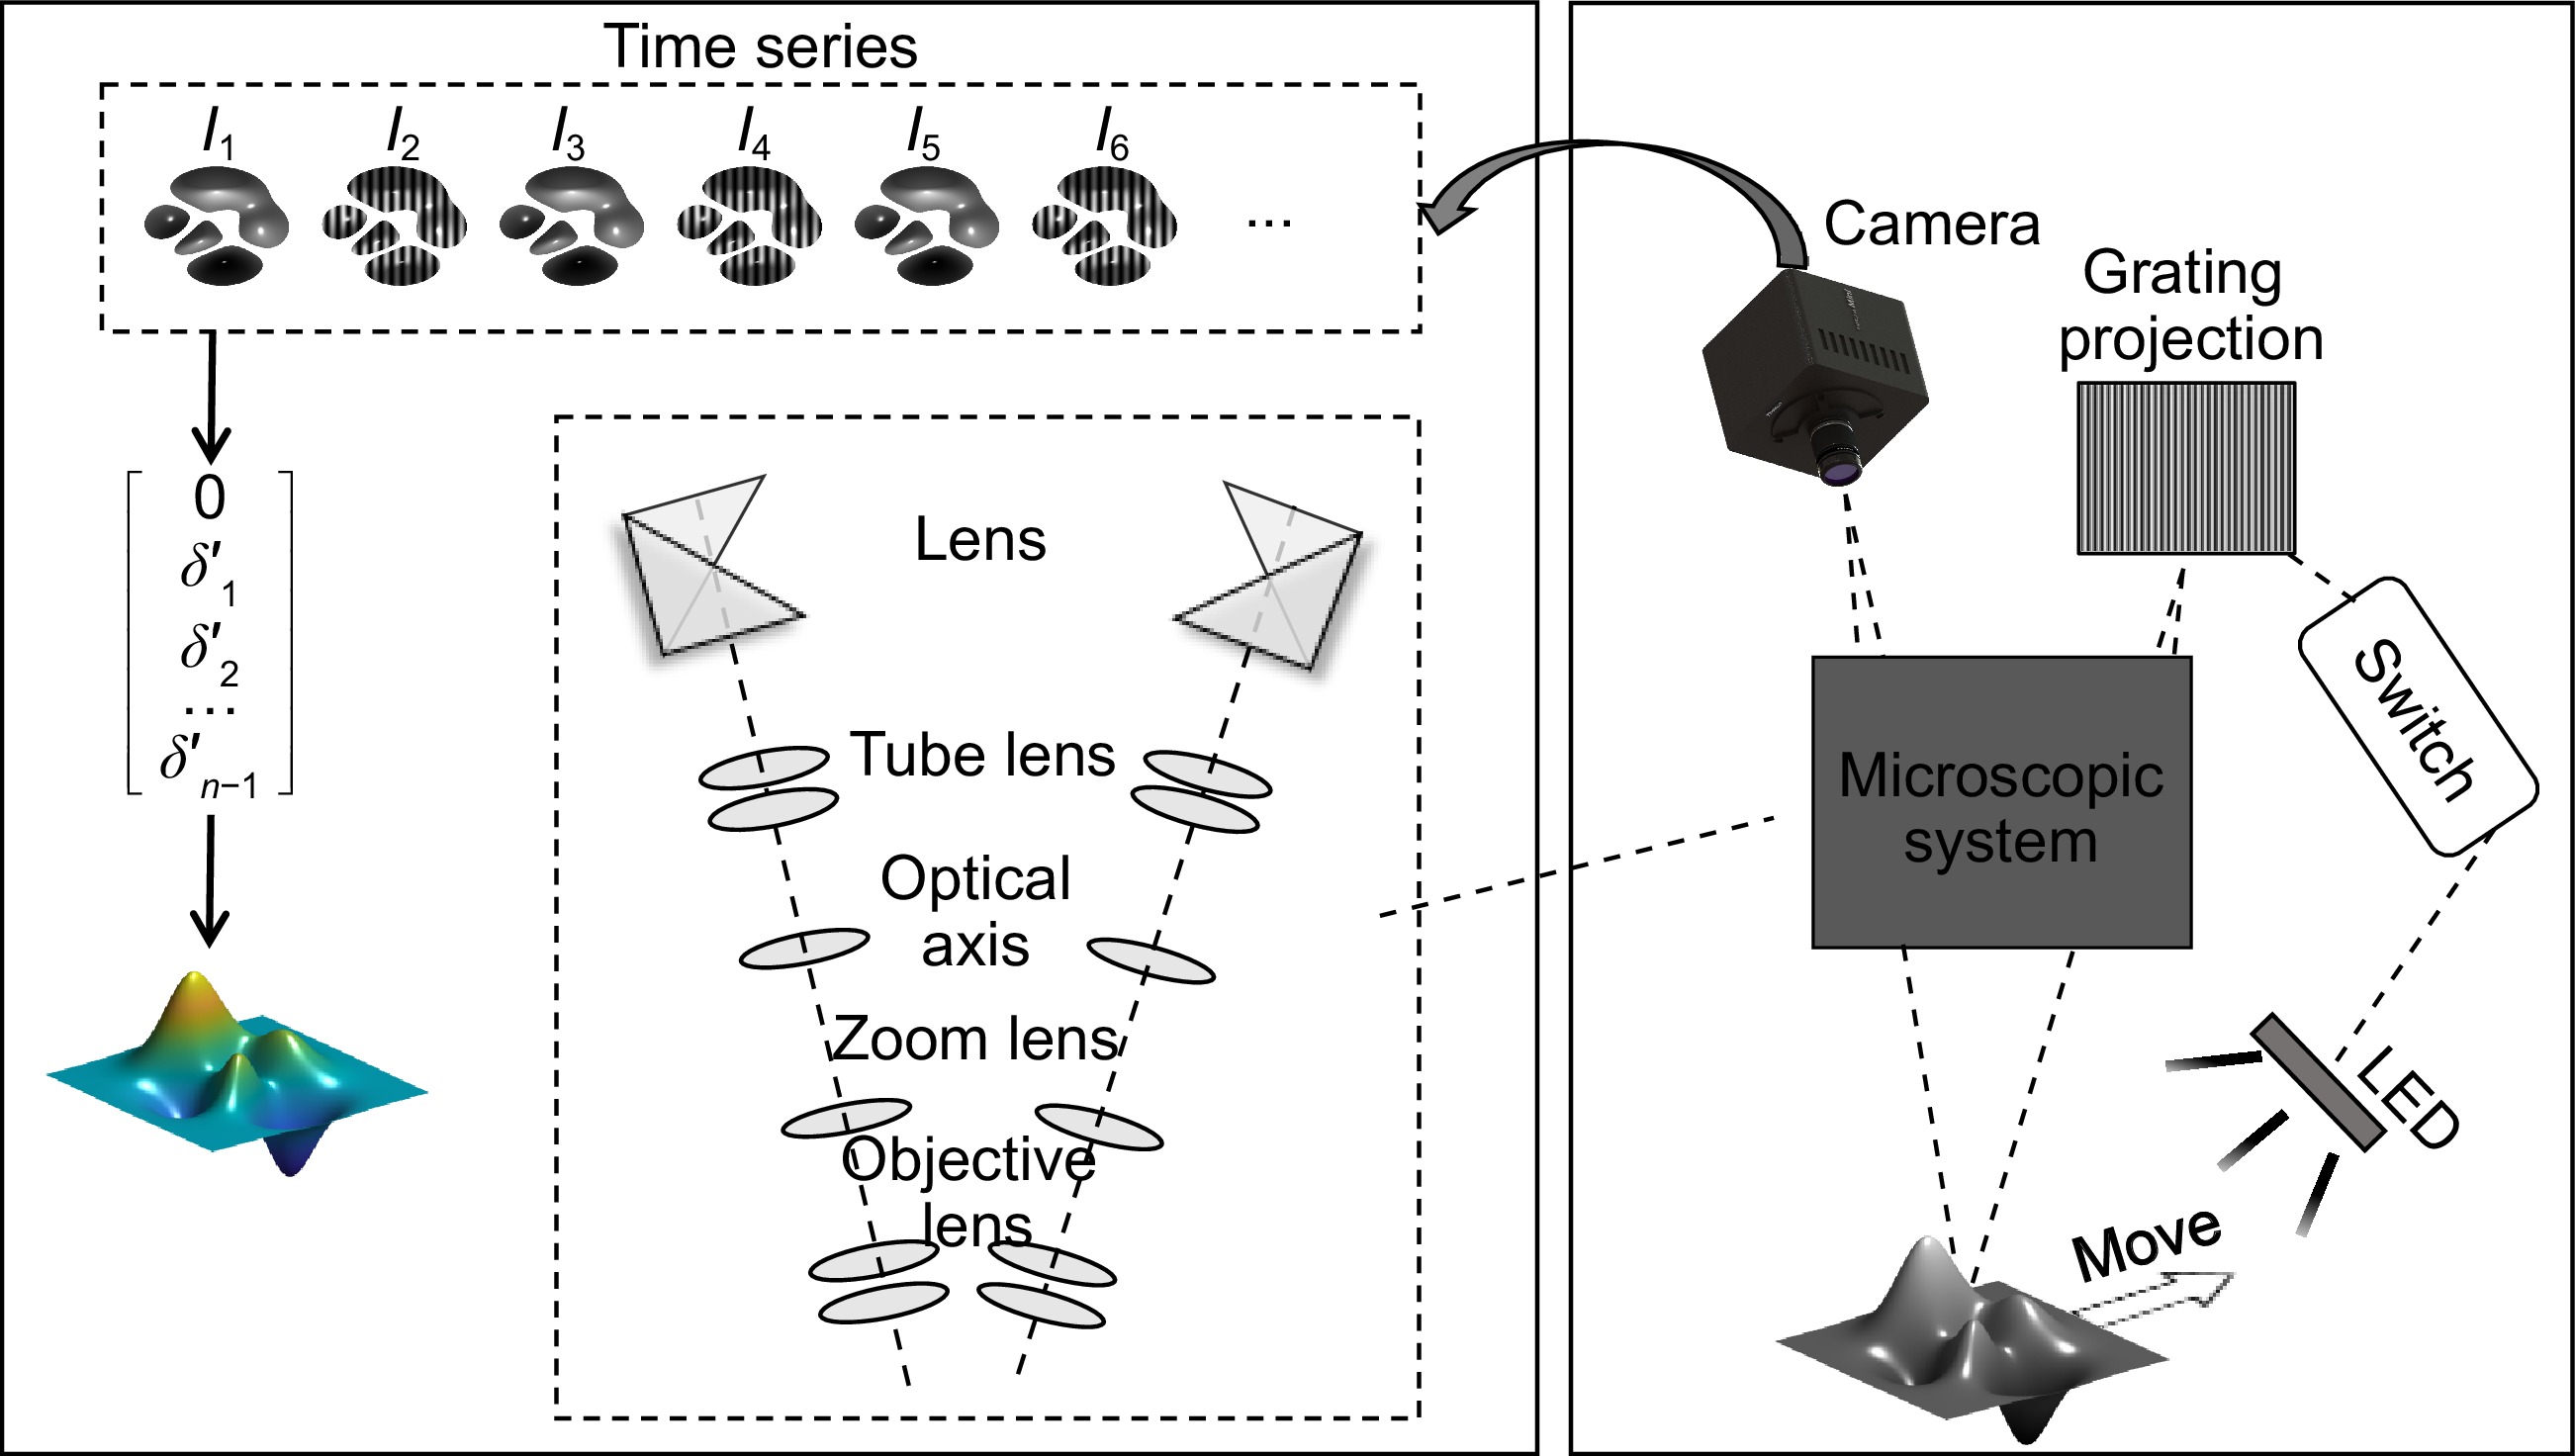
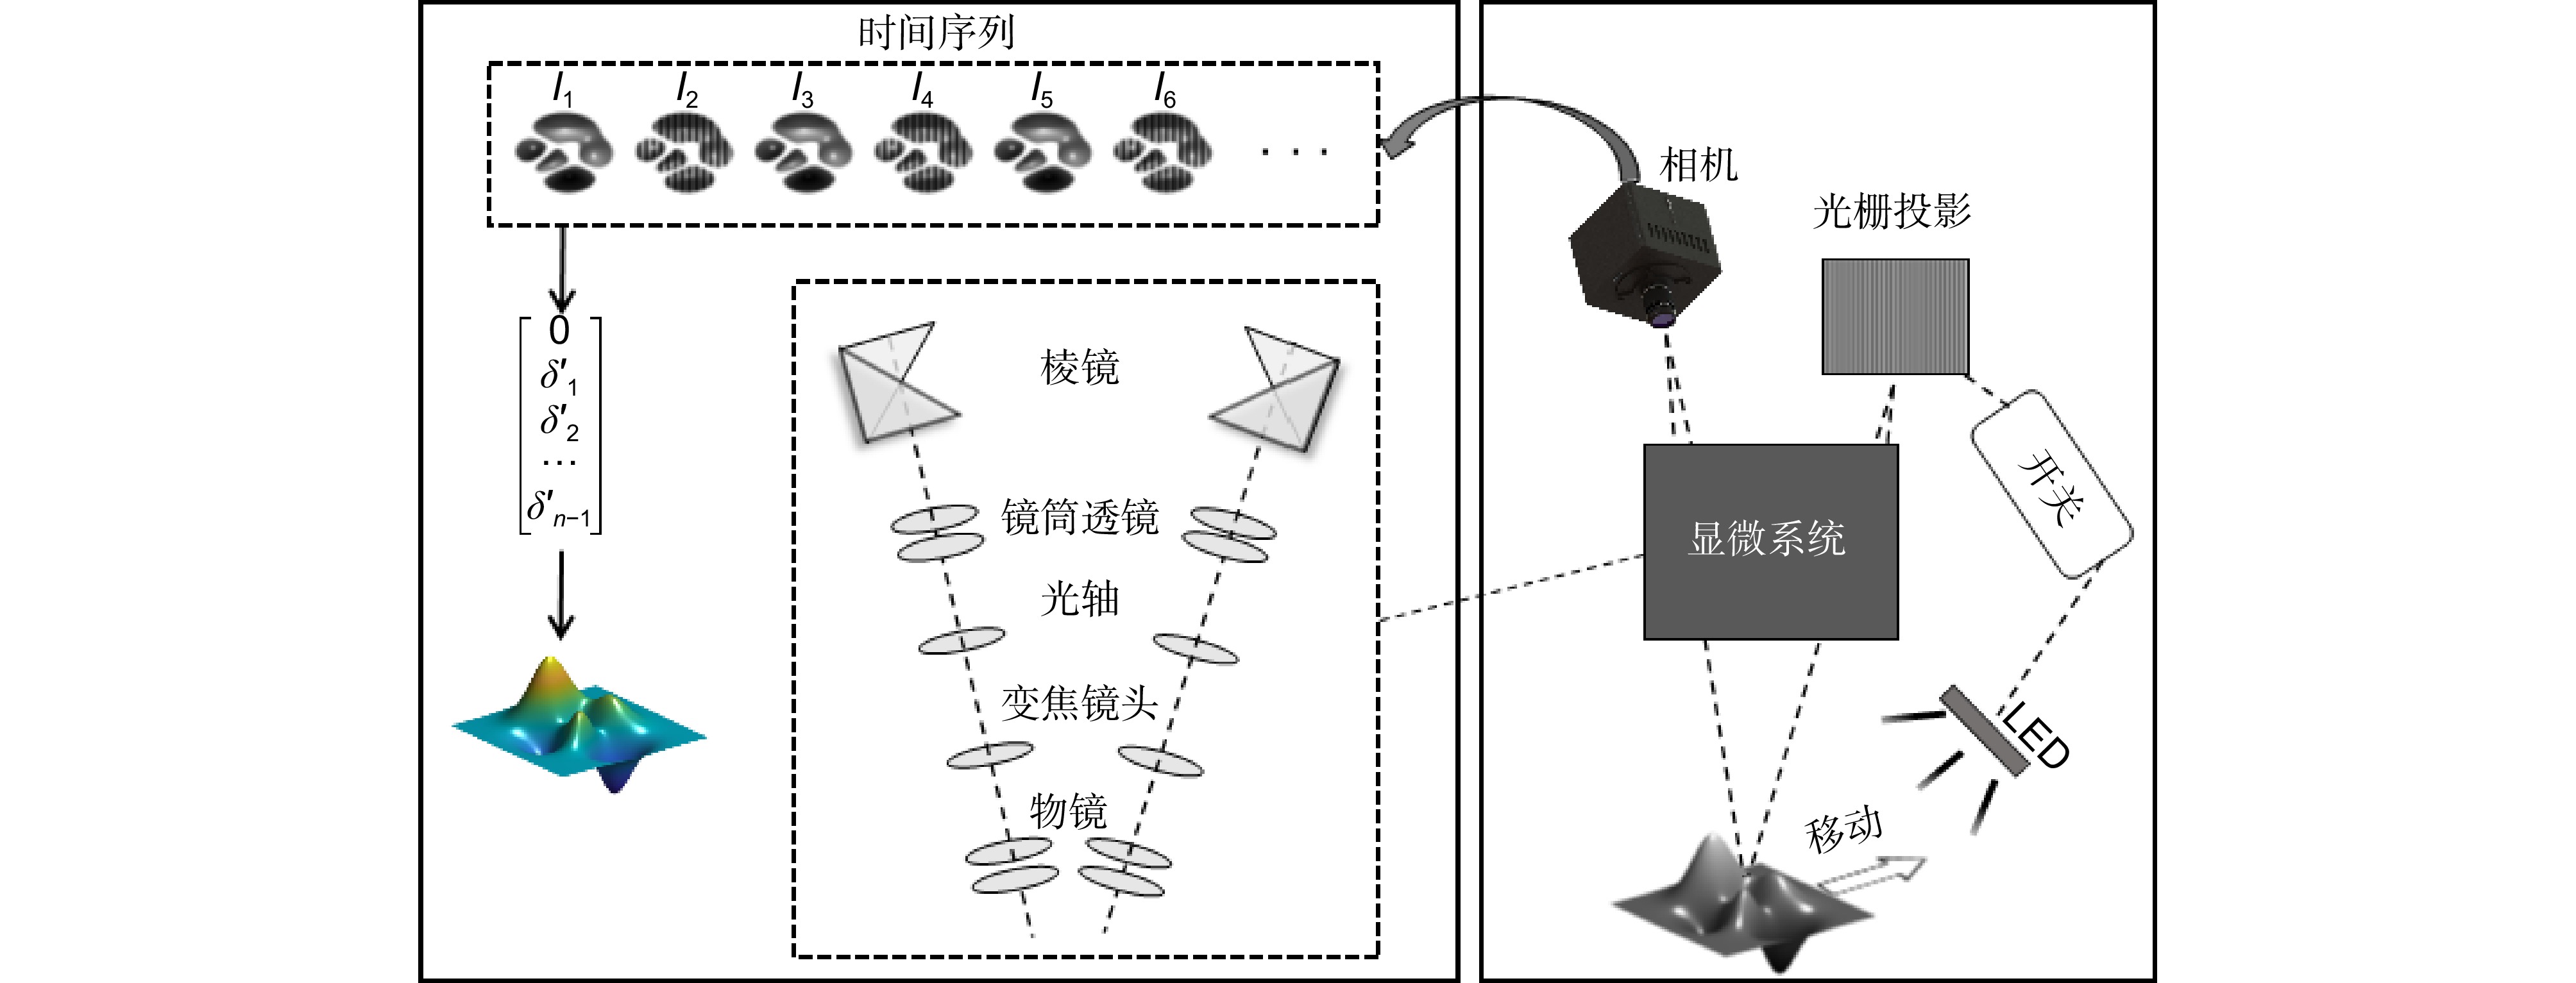
Overview: In recent years, fringe projection profilometry has emerged as a powerful tool for measuring and inspecting the three-dimensional (3D) morphology of objects. Among them, phase measurement profilometry (PMP) has garnered significant attention due to its high precision. Traditionally, at least three deformed fringe images are required for phase retrieval. To achieve higher precision, even more deformed fringe images are typically needed. In industrial applications, such as inspections on production lines where new samples continuously flow in and out, or to measure large samples with a set of small fields of views for high precision. This necessitates a motion scheme to complete the inspection process. Therefore, it will be promising to integrate the phase-shifting process of PMP with lateral motion. This type of lateral scanning process has been validated in white light interferometry and structured illumination microscopy. This paper proposes a scanning microscopic PMP that combines phase shifting with object translation, reducing measurement complexity and enhancing measurement efficiency. In this design, the measuring unit is fixed and the measuring object is moved along the translation stage. The camera is synchronized with the translation stage and the switching of the white light and structured light illuminations. Then sequential images will be captured with one deformed image and one white light image continuously. The phase drilling process consists of two main steps. The first step is pixel matching, which is used to align the images captured at different positions. The white light images are used to find the amount of pixel shift by optical flow methods, which can reach a sub-pixel level precision via linear interpolation. Then the pixel matching of the fringe images will be fulfilled while we assume the translation is consistent. The second step is to decipher the phase with these matched fringe images. Here, an arbitrary N-step phase-shifting technique is adopted instead of the classical N-step phase-shifting approach. Moreover, a telecentric optical path system is employed to ensure consistency between the actual object movement and pixel shift. The initial phase shift is determined by the offset pixels and the initially estimated fringe period, which is optimized through a probability density function. The experiments in this paper compare static and dynamic results, with the static position fixed as the starting point for dynamic measurements to ensure consistent comparison. The results demonstrate the feasibility of the proposed method, achieving measurement accuracy comparable to traditional PMP systems, with a maximum measurement accuracy of 0.008 mm in planar validation experiments.
-

-
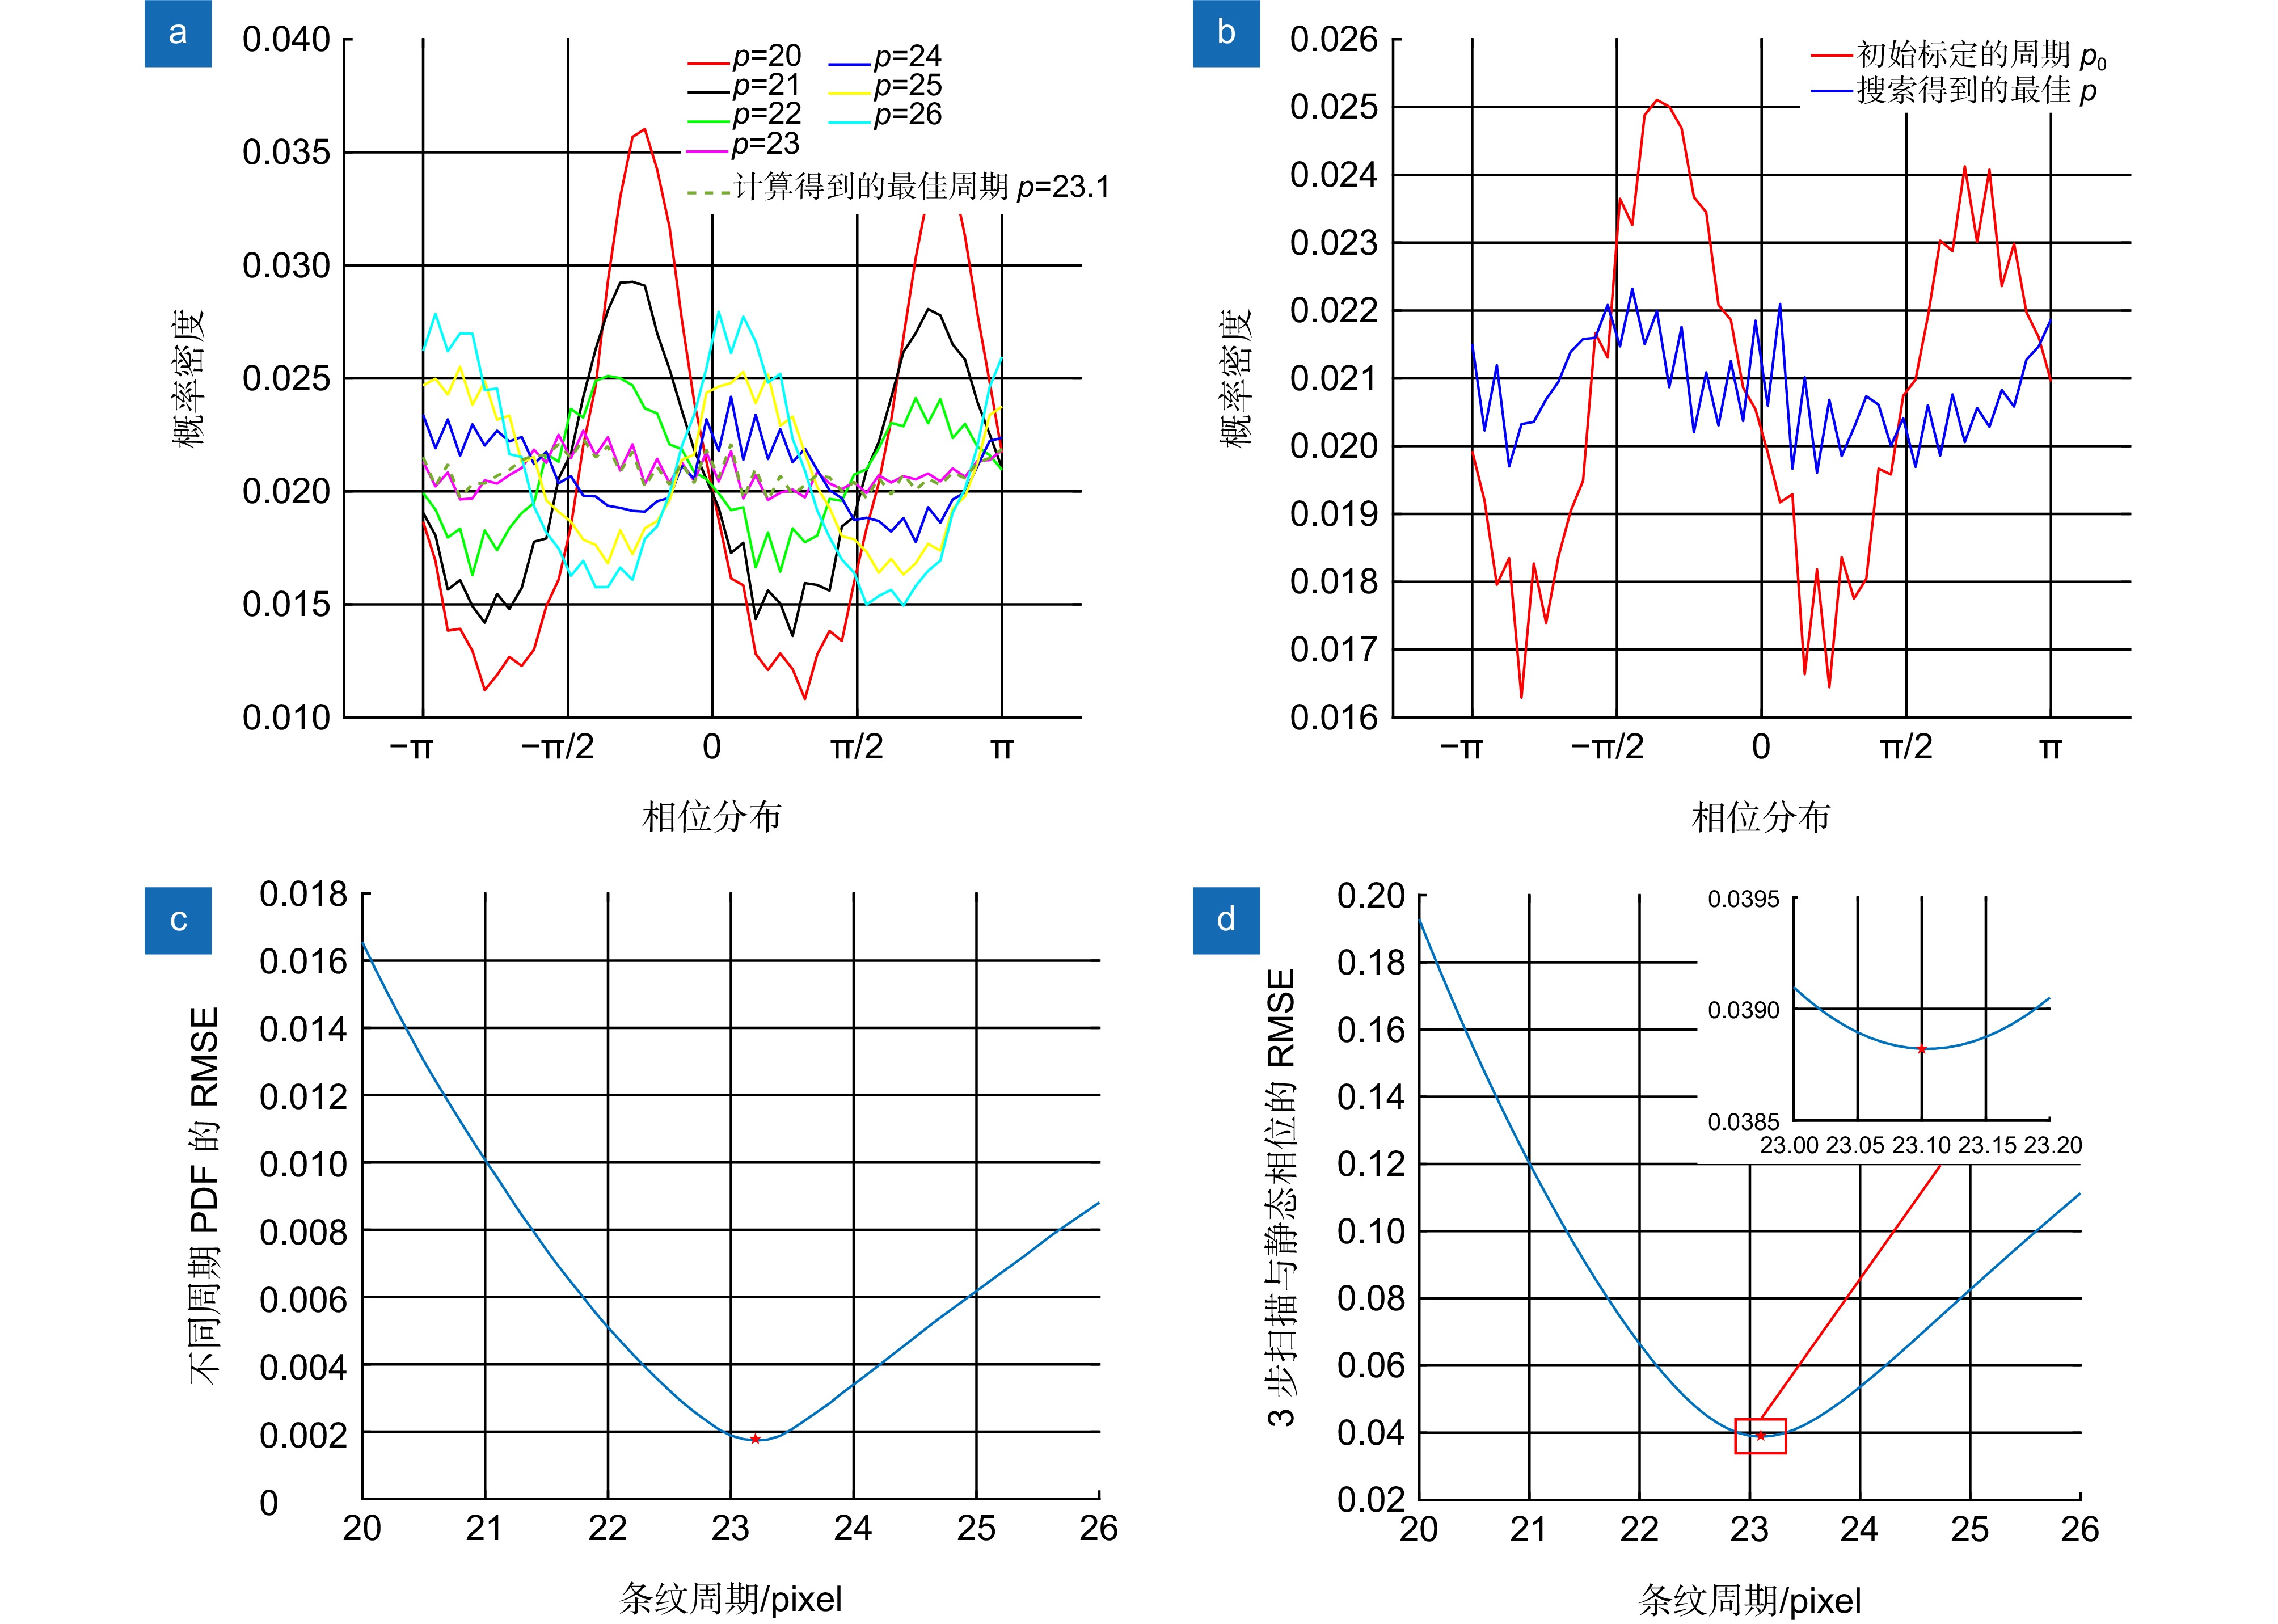
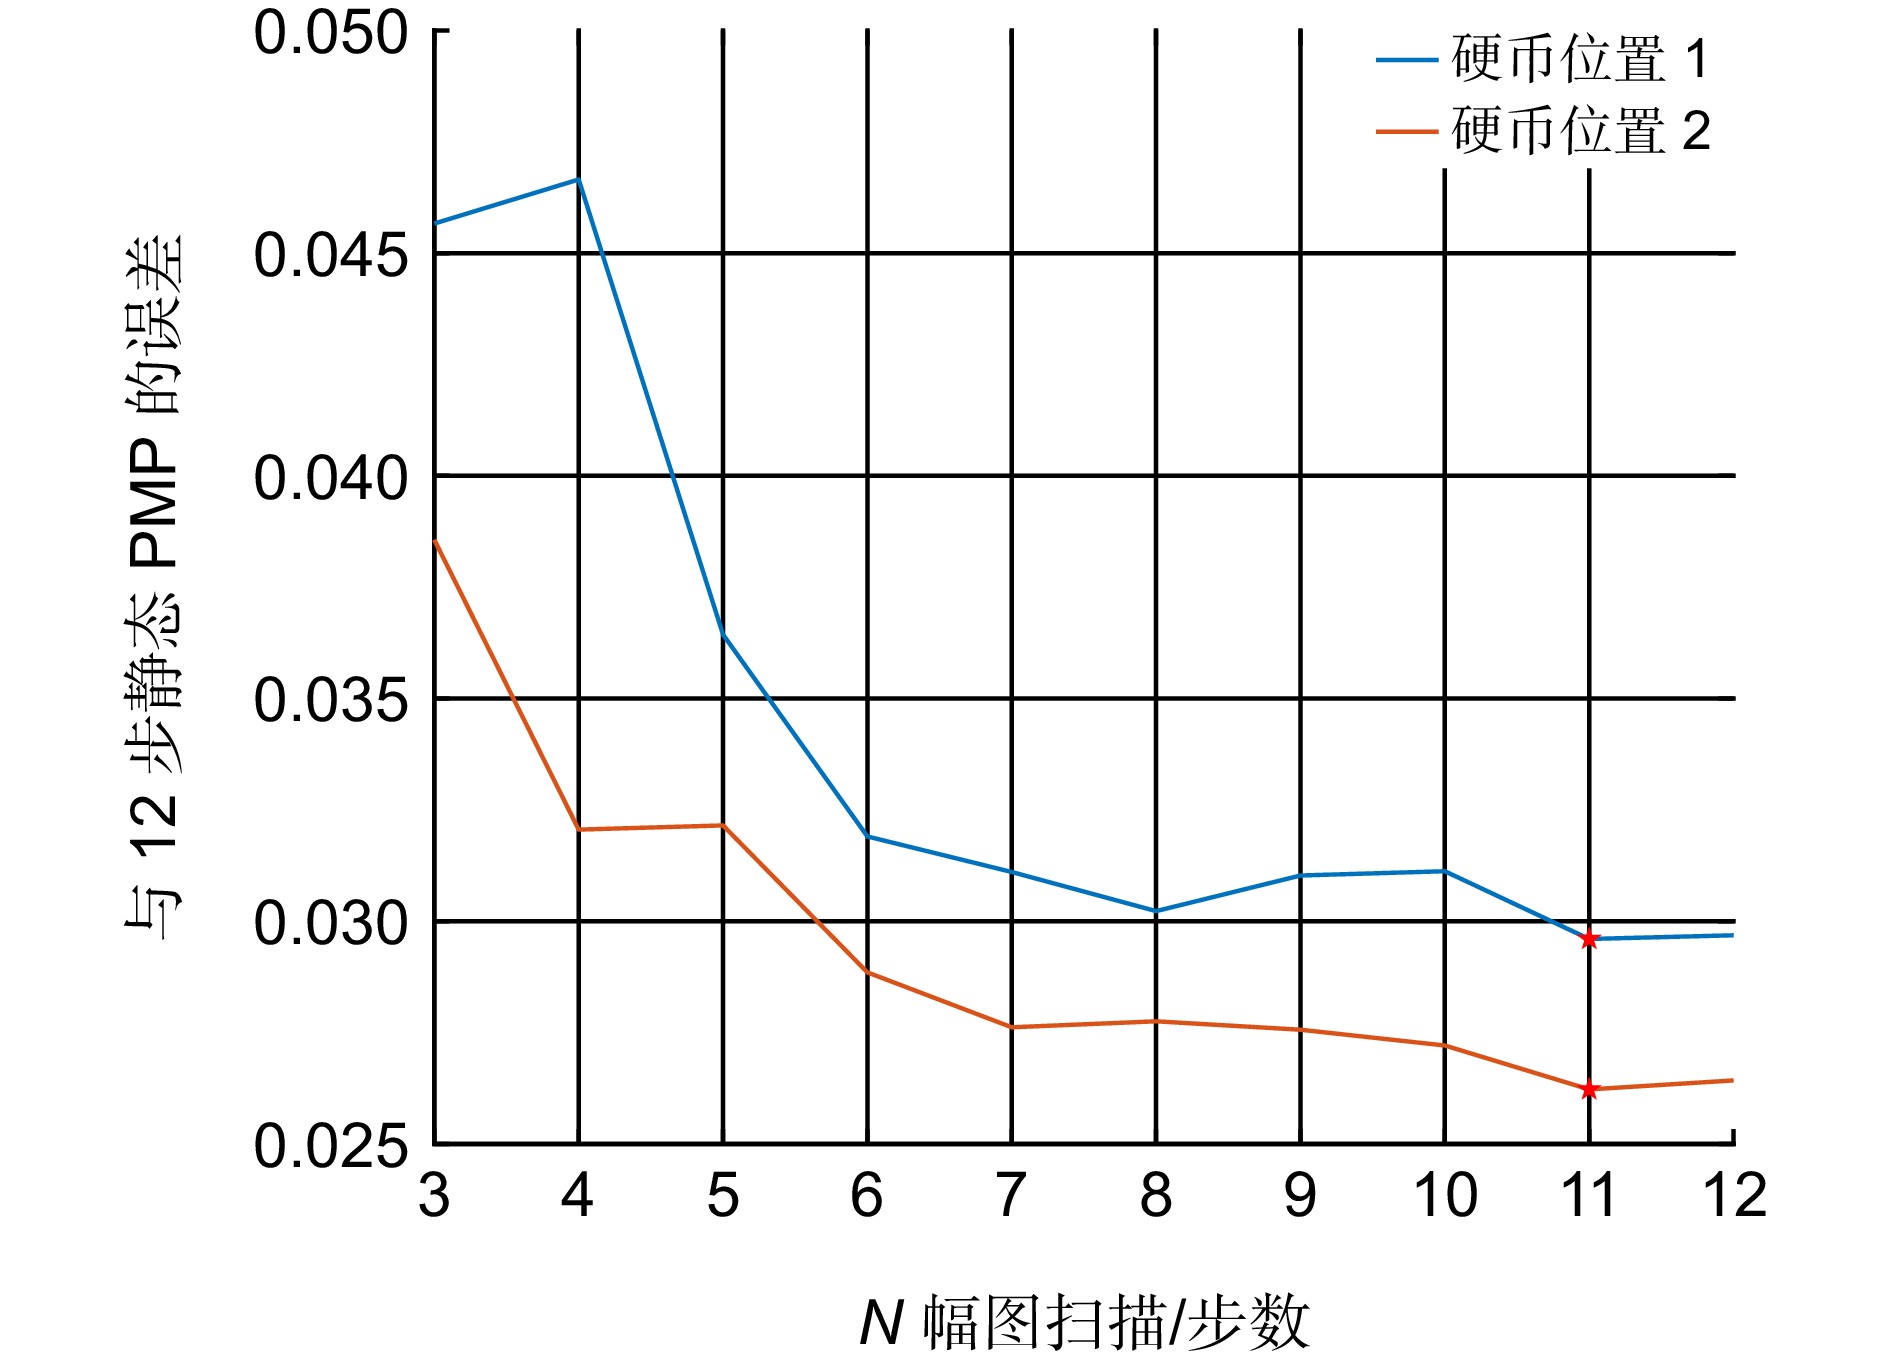
图 2 不同周期计算的截断相位PDF曲线及其RMSE曲线。(a)不同周期计算的截断相位的概率密度分布;(b)标定的初始周期和最佳周期计算的结果对比;(c)不同周期计算结果的RMSE分布;(d)不同周期计算的截断相位与静态12步相移的RMSE
Figure 2. PDF distribution with different phase shift errors and their error curves. (a) The PDF of the wrapped phase calculated at different periods; (b) Comparison of the results of the period of calibration and the optimal period calculation; (c) RMSE distribution of calculation results at different periods; (d) RMSE between wrapped phase and static 12-steps phase-shift calculated at different periods
表 1 光流法计算得到的匹配量与相移量
Table 1. The matching quantity and phase-shift quantity calculated by optical flow method
白场/第2k-1帧 1 3 5 7 9 11 13 15 17 19 21 23 匹配量/pixel [0 0] [2.4 0.1] [4.6 0.1] [7.2 0.2] [9.4 0.2] [11.6 0.2] [14.2 0.2] [16.5 0.2] [18.7 0.2] [21.3 0.3] [23.5 0.3] [25.8 0.3] 条纹场/第2k帧 2 4 6 8 10 12 14 16 18 20 22 24 相移量/rad 0 0.656 1.257 1.967 2.568 3.169 3.880 4.508 5.109 5.819 6.420 7.048 表 2 不同步数扫描截断相位
Table 2. RMSE of different steps scan wrapped phase
扫描步数RMSE/rad 参与计算的图像序号 硬币位置1 硬币位置2 3步 2, 8, 16 0.0457 0.0386 6步 2, 4, 6, 10, 14, 18 0.0319 0.0289 12步 全部 0.0296 0.0262 表 3 不同高度平面的误差分析
Table 3. Error analysis of planes with different heights
0.4 mm 1.2 mm 2 mm m1/mm 0.3973 1.2002 1.9936 m2/mm 0.3967 1.1937 1.9907 RMSE1/mm 0.0095 0.0099 0.0087 RMSE2/mm 0.0120 0.0114 0.0116 -
参考文献
[1] 楚冬娅, 张广汇, 宋仁杰, 等. 先验知识辅助的条纹投影动态三维形貌测量[J]. 光电工程, 2022, 49(8): 210449. doi: 10.12086/oee.2022.210449
Chu D Y, Zhang G H, Song R J, et al. Priori knowledge assisted dynamic 3D shape measurement with fringe projection[J]. Opto-Electron Eng, 2022, 49(8): 210449. doi: 10.12086/oee.2022.210449
[2] 向卓龙, 张启灿, 吴周杰. 结构光投影三维面形测量及纹理贴图方法[J]. 光电工程, 2022, 49(12): 220169. doi: 10.12086/oee.2022.220169
Xiang Z L, Zhang Q C, Wu Z J. 3D shape measurement and texture mapping method based on structured light projection[J]. Opto-Electron Eng, 2022, 49(12): 220169. doi: 10.12086/oee.2022.220169
[3] 应晓霖, 姚建云, 张晓松, 等. 采用LD的光源步进条纹投影三维测量系统[J]. 光电工程, 2021, 48(11): 210298. doi: 10.12086/oee.2021.210298
Ying X L, Yao J Y, Zhang X S, et al. Fringe projection based three-dimensional measurement system by the light-source-stepping method using LD[J]. Opto-Electron Eng, 2021, 48(11): 210298. doi: 10.12086/oee.2021.210298
[4] 邵金凤, 倪育博, 孟召宗, 等. 基于离焦二值显示和条纹投影的复合表面三维测量方法[J]. 光电工程, 2024, 51(4): 240024. doi: 10.12086/oee.2024.240024
Shao J F, Ni Y B, Meng Z Z, et al. Three-dimensional shape measurement of composite surface based on defocused binary display and fringe projection[J]. Opto-Electron Eng, 2024, 51(4): 240024. doi: 10.12086/oee.2024.240024
[5] 彭云峰, 何佳宽, 黄雪鹏, 等. 光学元件超精密磨抛加工技术研究与装备开发[J]. 光电工程, 2023, 50(4): 220097. doi: 10.12086/oee.2023.220097
Peng Y F, He J K, Huang X P, et al. Ultra-precision grinding and polishing processing technology research and equipment development[J]. Opto-Electron Eng, 2023, 50(4): 220097. doi: 10.12086/oee.2023.220097
[6] Su X Y, Chen W J. Fourier transform profilometry: a review[J]. Opt Lasers Eng, 2001, 35(5): 263−284. doi: 10.1016/S0143-8166(01)00023-9
[7] Wu H T, Cao Y P, An H H, et al. Ultrafast spatial phase unwrapping algorithm with accurately correcting transient phase error[J]. Opt Lett, 2021, 46(24): 6091−6094. doi: 10.1364/OL.446022
[8] 吴开华, 王文杰. 植保无人机结构光视觉的障碍物检测方法[J]. 光电工程, 2018, 45(4): 170613. doi: 10.12086/oee.2018.170613
Wu K H, Wang W J. Detection method of obstacle for plant protection UAV based on structured light vision[J]. Opto-Electron Eng, 2018, 45(4): 170613. doi: 10.12086/oee.2018.170613
[9] 戴子旭, 杨国辉, 高艺恒, 等. 基于随动三维视觉的大位移测量方法研究[J]. 光学学报, 2024, 44(19): 1912002. doi: 10.3788/AOS240858
Dai Z X, Yang G H, Gao Y H, et al. Research on large displacement measurement method based on servo 3D vision[J]. Acta Opt Sin, 2024, 44(19): 1912002. doi: 10.3788/AOS240858
[10] 王启江, 刘元坤, 魏振东, 等. 面向高反物体的区域映射自适应条纹投影方法[J]. 激光杂志, 2024, 45(5): 34−40. doi: 10.14016/j.cnki.jgzz.2024.05.034
Wang Q J, Liu Y K, Wei Z D, et al. Adaptive fringe projection algorithm based on region mapping for high-reflectivity surfaces[J]. Laser J, 2024, 45(5): 34−40. doi: 10.14016/j.cnki.jgzz.2024.05.034
[11] Zhai A P, Cao Y P, Huang Z F. On-line phase measuring profilometry based on a single frame of deformed pattern[J]. Optik, 2012, 123(14): 1311−1315. doi: 10.1016/j.ijleo.2011.11.013
[12] 吴海涛, 曹益平, 李洋, 等. 基于改进网格运动统计特征的在线三维测量[J]. 光子学报, 2021, 50(1): 0112002. doi: 10.3788/gzxb20215001.0112002
Wu H T, Cao Y P, Li Y, et al. Online three-dimension measurement based on improved grid motion statistical features[J]. Acta Photonica Sin, 2021, 50(1): 0112002. doi: 10.3788/gzxb20215001.0112002
[13] Wu Y C, Cao Y P, Lu M T, et al. An on-line phase measuring profilometry based on modulation[J]. Opt Appl, 2012, 42(1): 31−41. doi: 10.5277/oa120103
[14] 彭旷, 曹益平, 武迎春, 等. 基于低调制度特征的在线三维测量方法[J]. 中国激光, 2013, 40(7): 0708006. doi: 10.3788/cjl201340.0708006
Peng K, Cao Y P, Wu Y C, et al. On-line three-dimensional measurement method based on low modulation feature[J]. Chin J Lasers, 2013, 40(7): 0708006. doi: 10.3788/cjl201340.0708006
[15] 张文雪, 罗一涵, 刘雅卿, 等. 基于主动位移成像的图像超分辨率重建[J]. 光电工程, 2024, 51(1): 230290. doi: 10.12086/oee.2024.230290
Zhang W X, Luo Y H, Liu Y Q, et al. Image super-resolution reconstruction based on active displacement imaging[J]. Opto-Electron Eng, 2024, 51(1): 230290. doi: 10.12086/oee.2024.230290
[16] 喻睿智, 曹益平. 一种采用相位测量轮廓术的工件在线三维检测方法[J]. 光子学报, 2008, 37(6): 1139−1143.
Yu R Z, Cao Y P. A three dimensional on-line inspecting method for workpiece by PMP[J]. Acta Photonica Sin, 2008, 37(6): 1139−1143.
[17] 郑旭, 曹益平, 李坤. 基于调制度层析的在线三维测量方法[J]. 光学学报, 2010, 30(9): 2573−2577. doi: 10.3788/AOS20103009.2573
Zheng X, Cao Y P, Li K. An on-line 3D measurement method based on modulation delamination[J]. Acta Opt Sin, 2010, 30(9): 2573−2577. doi: 10.3788/AOS20103009.2573
[18] 许幸芬, 曹益平, 彭旷. 基于相位预测的在线三维测量像素匹配方法[J]. 光学学报, 2016, 36(6): 0612005. doi: 10.3788/AOS201636.0612005
Xu X F, Cao Y P, Peng K. Pixel matching method in on-line three-dimensional measurement based on phase prediction[J]. Acta Opt Sin, 2016, 36(6): 0612005. doi: 10.3788/AOS201636.0612005
[19] 马颂德, 张正友. 计算机视觉: 计算理论与算法基础[M]. 北京: 科学出版社, 1998.
[20] Liu Y K, Yu X, Xue J P, et al. A flexible phase error compensation method based on probability distribution functions in phase measuring profilometry[J]. Opt Laser Technol, 2020, 129: 106267. doi: 10.1016/j.optlastec.2020.106267
-
访问统计


 E-mail Alert
 RSS
RSS
 下载:
下载:
