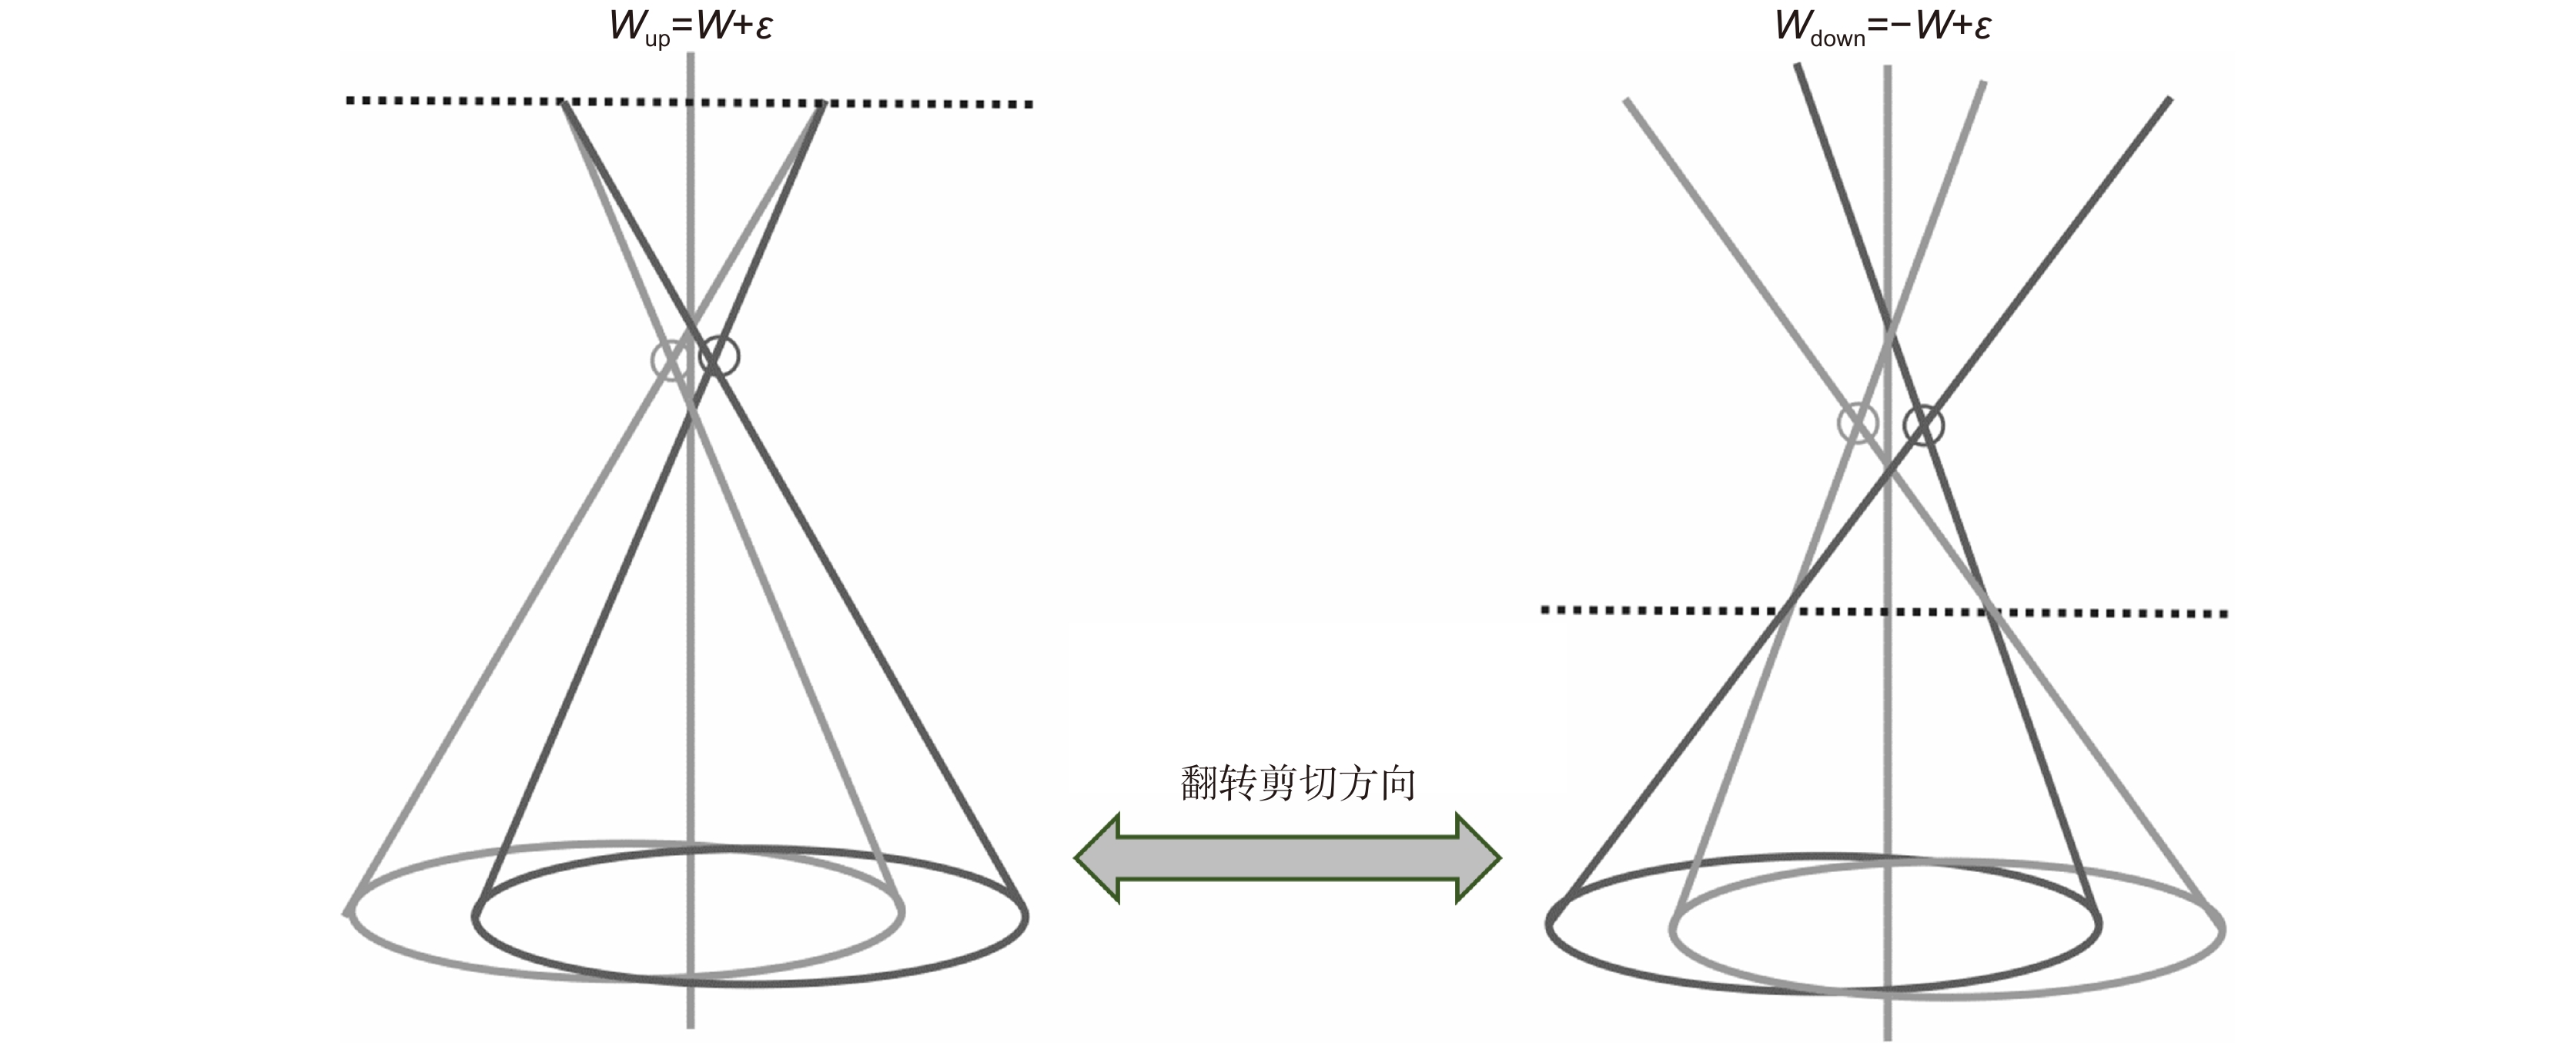
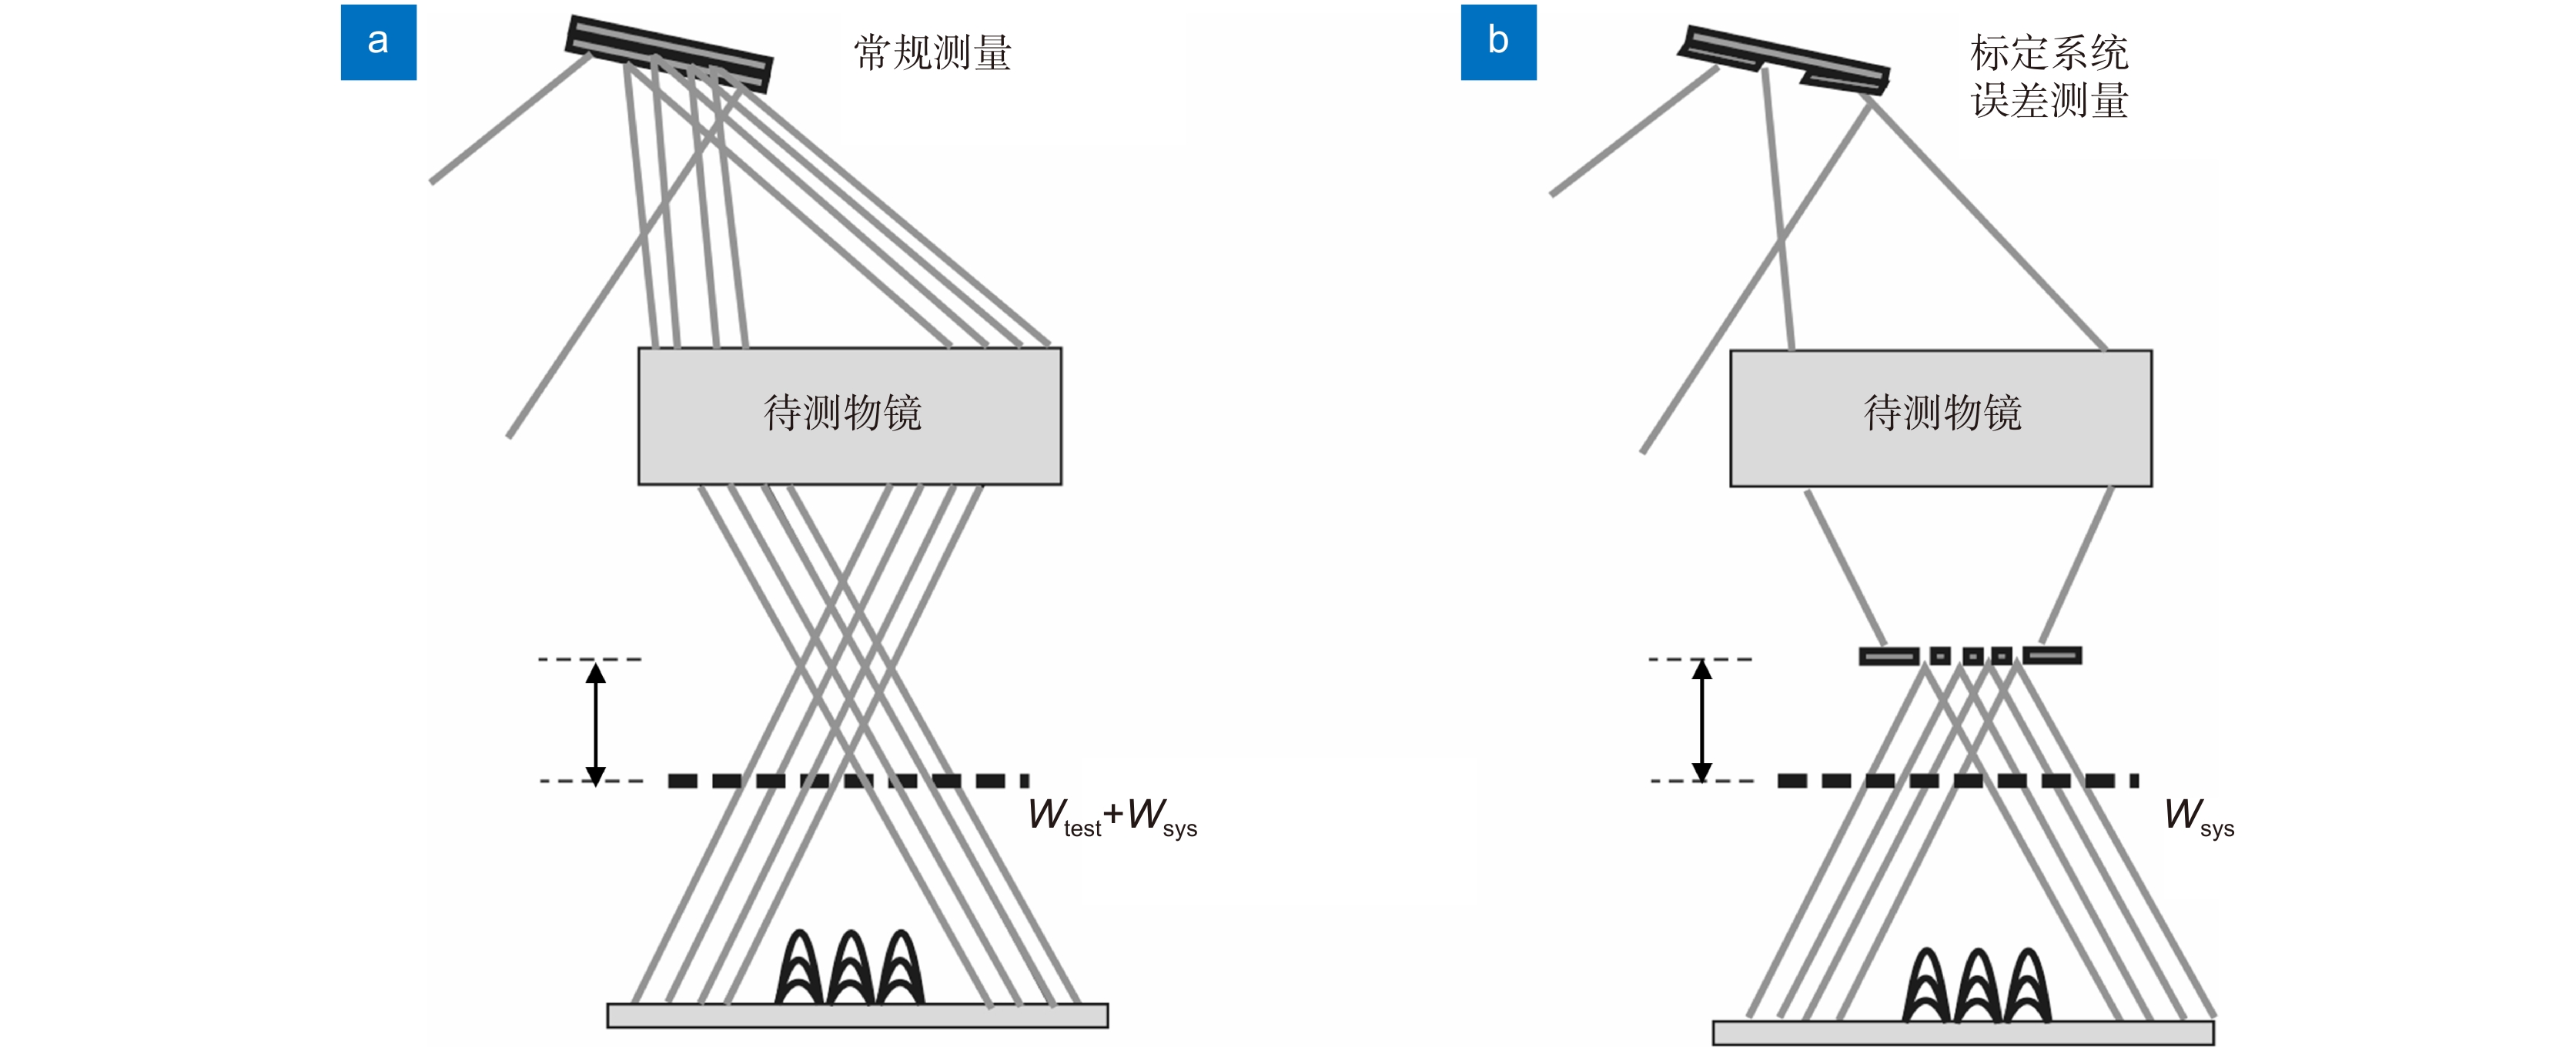
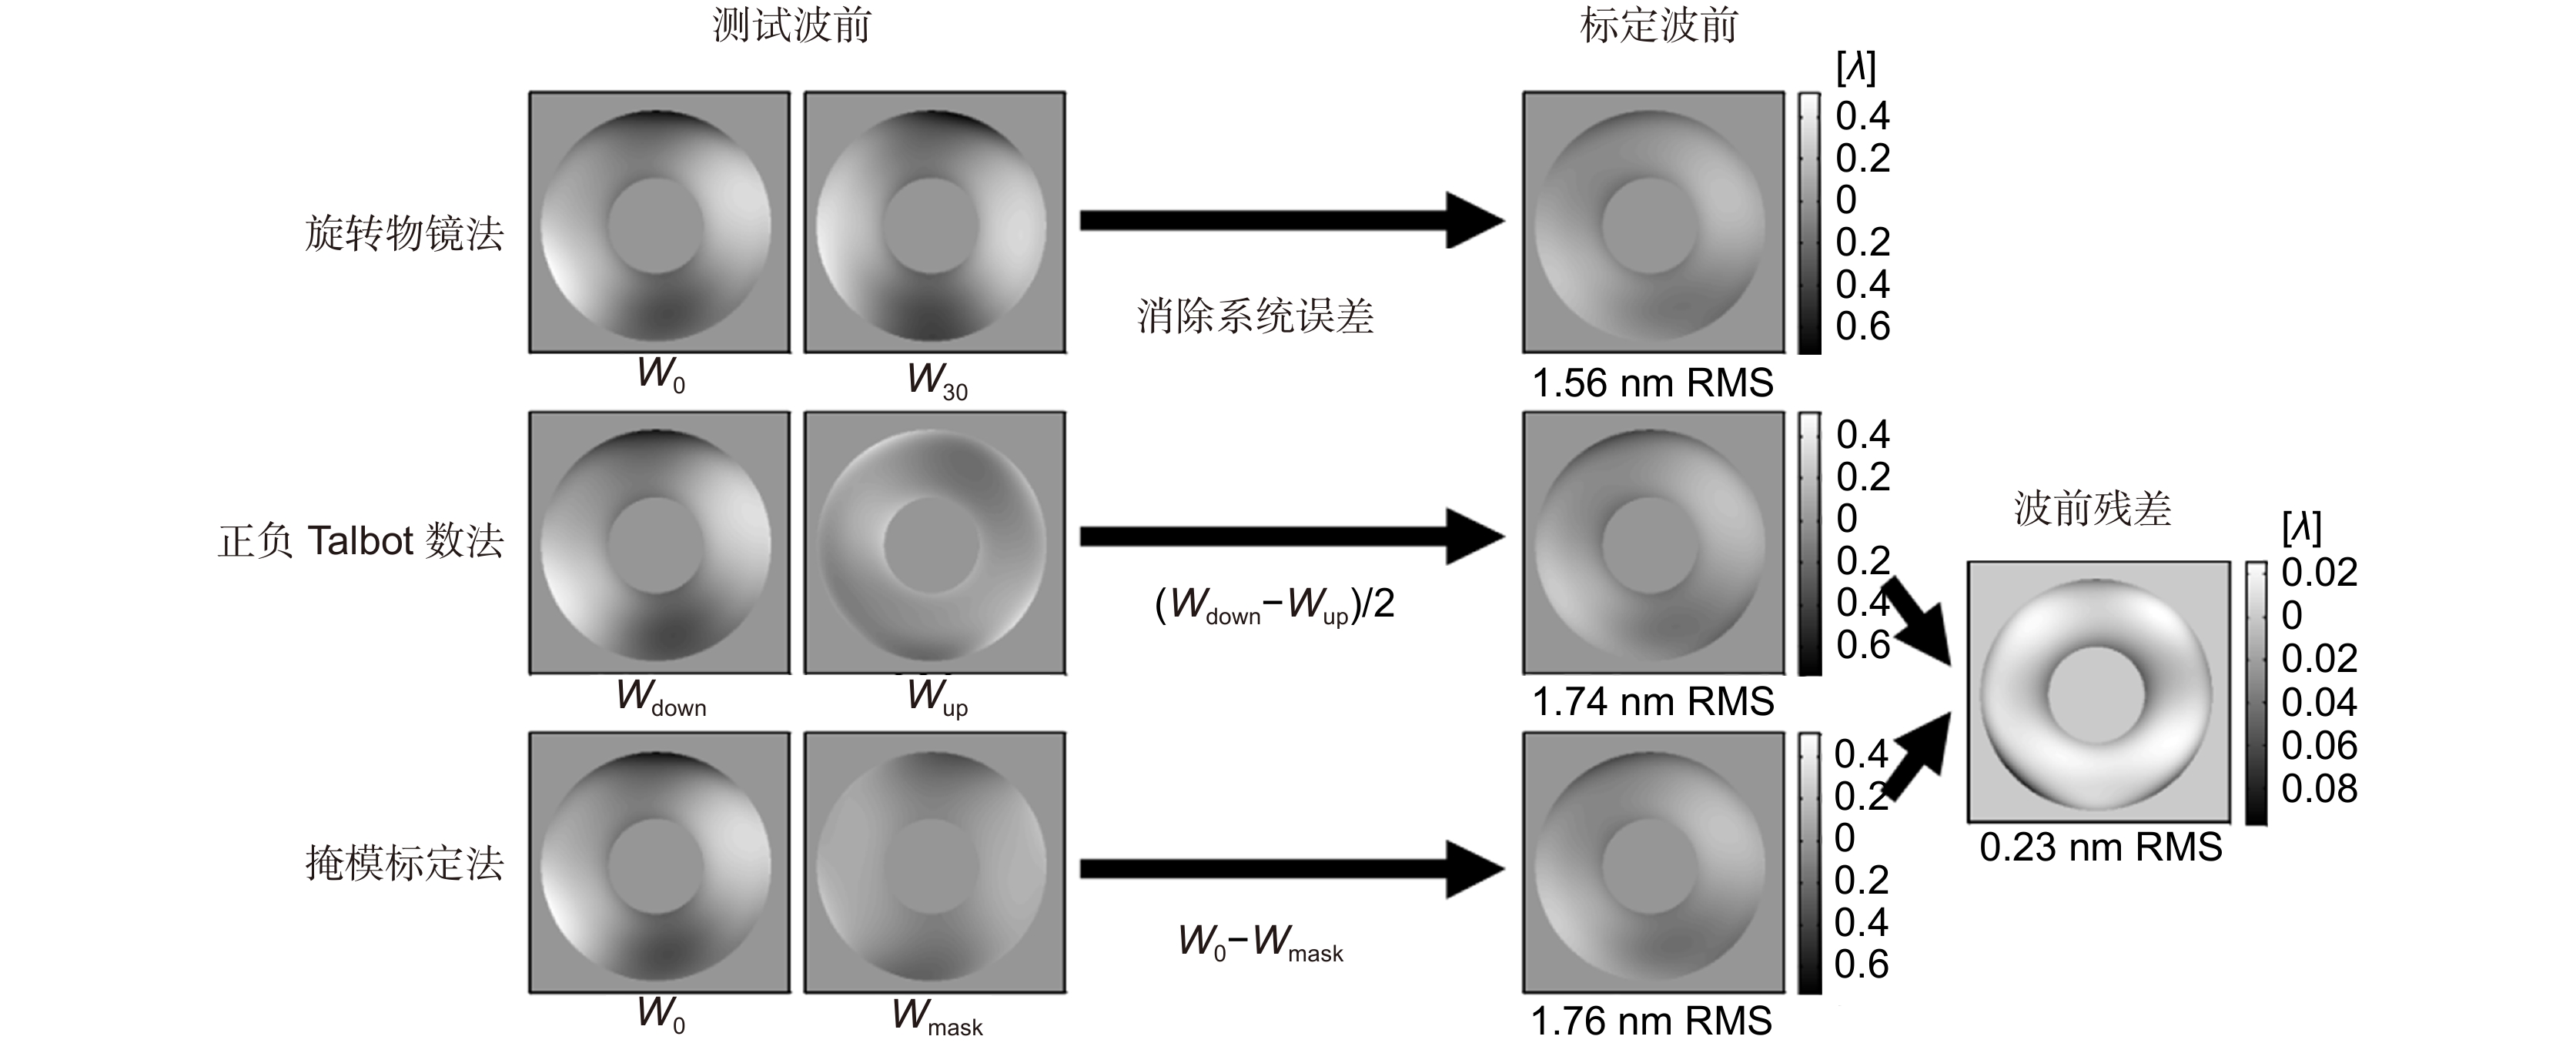
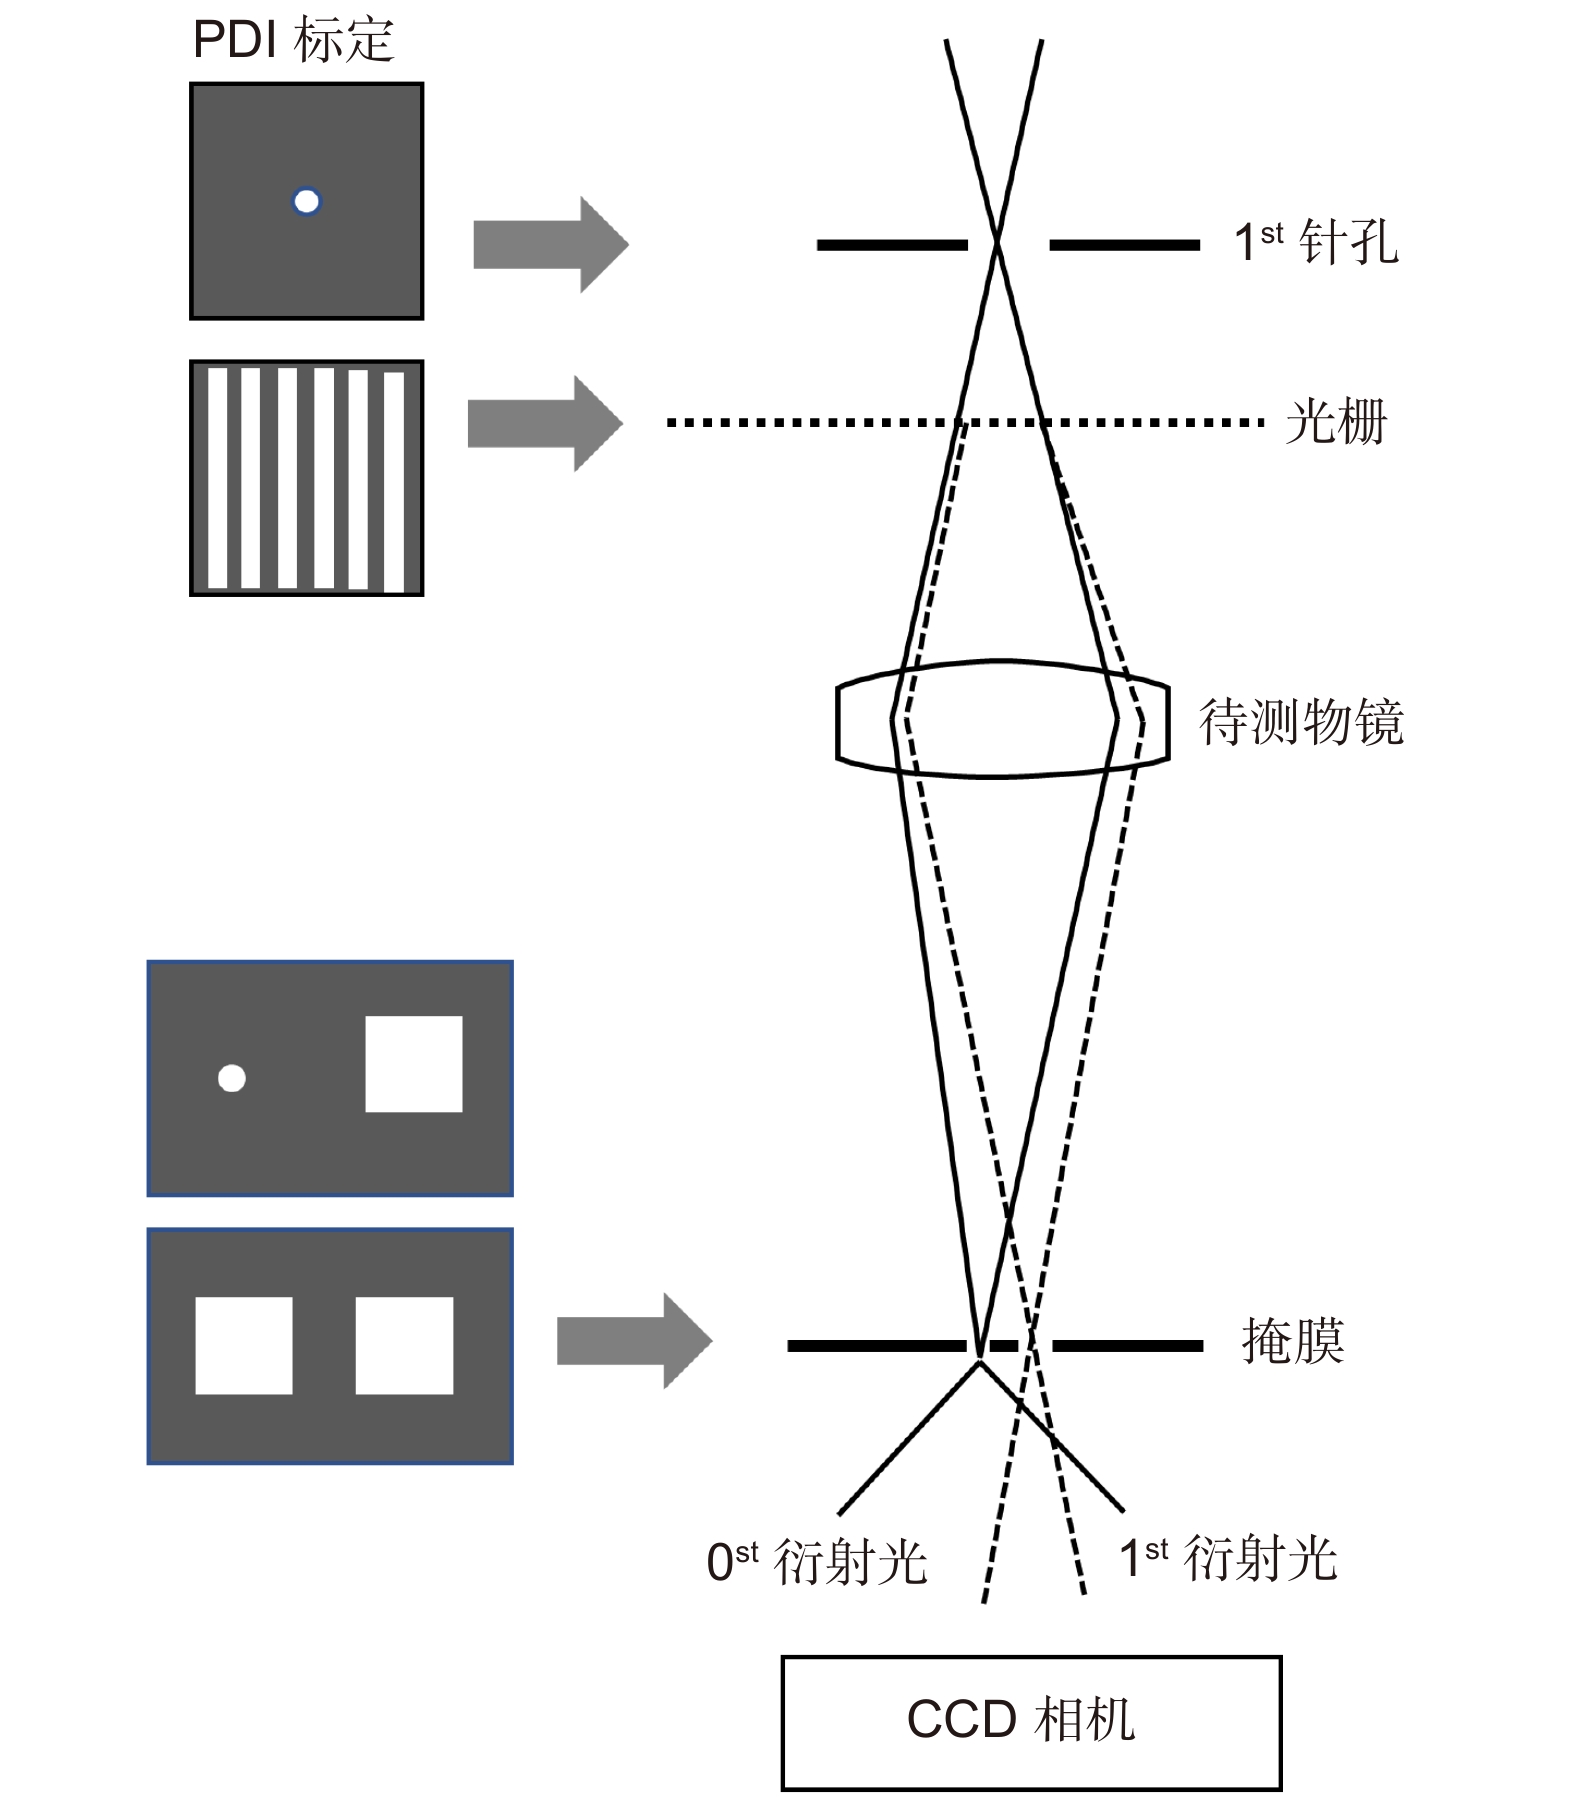
-
摘要:
光刻物镜是光刻机核心部件,其波像差大小决定着光刻机的分辨率和套刻精度。随着光刻机性能的逐步提升,光刻物镜波像差要求已经降低到0.5 nm (RMS)以下,这对波像差的检测是一个极大的挑战。现行的光刻物镜波像差检测方法(如哈特曼法,剪切干涉法和点衍射法等)的检测精度往往受限于其系统误差,而绝对检测技术是一种能够将系统误差分离出来的技术,最终突破精度极限。本文回顾了光刻物镜系统波像差检测方法和波前绝对检测技术,详细梳理了绝对检测技术在不同波像差检测方法中的应用和研究进展,重点总结了绝对检测技术在不同波像差检测方法中的技术难点,同时结合这些难点,展望了光刻物镜波像差绝对检测技术的未来发展趋势。
Abstract:The lithography objective is the core component of the lithography machine, and its wave aberration determines the resolution and overlay accuracy of the lithography machine. With the gradual improvement of the performance of the lithography machine, the wave aberration requirement of the lithography objective lens has been reduced to below 0.5 nm (RMS), which is a great challenge to the detection of the wave aberration. The detection accuracy of current lithography objective wave aberration detection methods (such as Hartmann method, shear interference method and point diffraction method, etc.) is often limited by its systematic error, and absolute detection technology is a method that can separate the systematic error. The technology that came out finally broke the limit of precision. This paper reviews the wave aberration detection method and surface absolute detection technology of lithography objective lens system, combs the application and research progress of absolute detection technology in wave aberration detection in detail, and summarizes the application of absolute detection technology in different wave aberration detection methods. At the same time, combined with these difficulties, the future development trend of the absolute detection technology of wave aberration of lithography objective lens is prospected.
-
Key words:
- lithography objective system /
- optical test /
- wave aberration /
- absolute test
-
Overview: The lithography objective lens system is the core component of the lithography machine, and the detection is the last process in the manufacture of the lithography objective lens system. The detection content includes the surface shape detection of a single lens and the wave aberration detection of the entire lithography objective lens system. In order to detect the surface shape of each surface of the lens, the wavefront is usually detected. The wave aberration of the lithography objective is a comprehensive reflection of the errors of each lens. It is necessary to detect the transmitted wavefront through all the lenses, which is related to the final accuracy of the lithography machine. Accurately detecting the wave aberration of the lithography objective lens system is conducive to improving the lithography processing accuracy of the lithography machine, and also plays an indispensable role in the development and manufacture of the lithography objective lens. As the working light wave becomes smaller, the precision needs to be improved to sub-nanometer precision, which has higher requirements for the detection of the wave aberration of the lithography objective. ASML, Cannon and Nikon hold a lot of technical secrets for lithography machine manufacturing and inspection, as does high-precision wave aberration inspection technology. We cannot know the high-precision detection technology of wave aberration proprietary to these companies, but absolute detection technology is a method that can effectively improve detection accuracy. The detection accuracy of current lithography objective wave aberration detection methods (such as Hartmann method, shear interference method and point diffraction method, etc.) is often limited by its systematic errors. The system error is separated, the wave aberration detection accuracy is further improved, and the accuracy limit is finally broken. Different wave aberration detection techniques are suitable for different absolute detection methods, but some other systematic error calibration ideas can be tried to develop new absolute detection techniques for lithography objective lenses. This paper reviews the wave aberration detection method and surface absolute detection technology of lithography objective lens system, combs the application and research progress of absolute detection technology in wave aberration detection in detail, and summarizes the application of absolute detection technology in different wave aberration detection methods. At the same time, combined with these difficulties, the future development trend of the absolute detection technology of wave aberration of lithography objective lens is prospected.
-

-
表 1 物镜具体参数
Table 1. Objective lens specific parameters
物镜 NA 有效焦距/mm 入瞳直径 工作距离/mm A 0.14 40 11.2 mm/373pixels 34 B 0.65 4.5 5.9 mm/197pixels 0.6 C 0.9 1.8 3.3 mm/110pixels 1.0 表 2 不同物镜测试结果的相对RMS误差
Table 2. Relative RMS error of different objective lenses test results
物镜 最大/% 最小/% 平均/% A 18.6 8.5 13.9 B 21.4 8.9 16.4 C 23.3 13.7 19.7 表 3 不同旋转角度的检测精度
Table 3. Detection accuracy of different rotation angles
旋转角度/(°) PV/mλ RMS/mλ 90 29 3.2 135 42 7.7 180 57 12.3 表 4 四种不同光刻物镜波像差绝对检测对比
Table 4. Comparison of absolute detection of wave aberration of four different lithography objectives
采集图像数量 可实现性 精度 传统干涉法 双球面法 少 一般 一般 随机球法 多 复杂 低 基于哈特曼法的绝对检测 少 简单 一般 光栅横向剪切 旋转物镜法 较多 一般 较高 Talbot数法 少 简单 高 掩模标定法 少 复杂 高 基于点衍射的绝对检测 少 复杂 高 -
[1] 姚汉民, 胡松, 邢廷文. 光学投影曝光微纳加工技术[M]. 北京: 北京工业大学出版社, 2006.
Yao M H, Hu S, Xing T W. Optical Projection Exposure Micro-Nano Processing Technology[M]. Beijing: Beijing University of Technology Press, 2006.
[2] De Boeij W P, Pieternella R, Bouchoms I, et al. Extending immersion lithography down to 1x nm production nodes[J]. Proc SPIE, 2013, 8683: 86831L. doi: 10.1117/12.2021397
[3] Quan H Y. Uncertainty evaluation for interferometric testing of absolute surface figure error[D]. Chengdu: University of Chinese Academy of Sciences, 2017.
[4] Poultney S K. Methods for measuring a wavefront of an optical system: 7602503[P]. 2009-10-13.
[5] Latypov A, Poultney S K, Vladimirsky Y. Method and system for wavefront measurements of an optical system: 7768653[P]. 2010-08-03.
[6] Sugisaki K, Okada M, Otaki K, et al. EUV wavefront measurement of six-mirror optics using EWMS[J]. Proc SPIE, 2008, 6921: 69212U. doi: 10.1117/12.772624
[7] Ohsaki Y, Mori T, Koga S, et al. A new on-machine measurement system to measure wavefront aberrations of projection optics with hyper-NA[J]. Proc SPIE, 2006, 6154: 615424. doi: 10.1117/12.657865
[8] Polo A, Bociort F, Pereira S F, et al. Wavefront measurement for EUV lithography system through Hartmann sensor[J]. Proc SPIE, 2011, 7971: 79712R. doi: 10.1117/12.877044
[9] Zhu Y C, Odate S, Sugaya A, et al. Method for designing phase-calculation algorithms for two-dimensional grating phase-shifting interferometry[J]. Appl Opt, 2011, 50(18): 2815−2822. doi: 10.1364/AO.50.002815
[10] Krasin G, Stsepuro N, Gritsenko I, et al. Holographic method for precise measurement of wavefront aberrations[J]. Proc SPIE, 2021, 11774: 1177407.
[11] Bautsch J, Schake M, Ehret G, et al. Traceable calibration of Shack–Hartmann wavefront sensors employing spherical wavefronts[J]. Opt Eng, 2020, 59(8): 084104.
[12] Dubey N, Kumar R, Rosen J. COACH-based Shack–Hartmann wavefront sensor with an array of phase coded masks[J]. Opt Express, 2021, 29(20): 31859−31874. doi: 10.1364/OE.438379
[13] Fuerst M E, Csencsics E, Berlakovich N, et al. Automated measurement of highly divergent optical wavefronts with a scanning shack–hartmann sensor[J]. IEEE Trans Instrument Measur, 2020, 70: 7001909.
[14] 诸波尔, 王向朝, 李思坤, 等. 超高NA光刻投影物镜高阶波像差检测方法[J]. 光学学报, 2017, 37(4): 0412003. doi: 10.3788/AOS201737.0412003
Zhu B E, Wang X Z, Li S K, et al. High-order aberration measurement method for hyper-NA lithographic projection lens[J]. Acta Opt Sin, 2017, 37(4): 0412003. doi: 10.3788/AOS201737.0412003
[15] Li P, Tang F, Wang X Z. Relationship between shear ratio and reconstruction accuracy in lateral shearing interferometry[J]. Opt Eng, 2020, 59(3): 034113. doi: 10.1117/1.OE.59.3.034113
[16] 杨济硕, 王向朝, 李思坤, 等. 基于相位环空间像主成分分析的投影物镜波像差检测方法[J]. 光学学报, 2014, 34(2): 0211004. doi: 10.3788/AOS201434.0211004
Yang J S, Wang X Z, Li S K, et al. In situ aberration measurement method based on a phase-shift rings target[J]. Acta Opt Sin, 2014, 34(2): 0211004. doi: 10.3788/AOS201434.0211004
[17] Li P, Tang F, Wang X Z. FFT wavefront reconstruction algorithm with periodical extension for lateral shearing interferometry[J]. Proc SPIE, 2020, 11552: 1155203. doi: 10.1117/12.2573639
[18] Li P, Tang F, Wang X Z. Comparison of processing speed of typical wavefront reconstruction methods for lateral shearing interferometry[J]. Appl Opt, 2020, 60(2): 312−325. doi: 10.1364/AO.409315
[19] Peng C Z, Tang F, Wang X Z, et al. Calibration method of shear amount based on the optical layout of point source microscope for lateral shearing interferometric wavefront sensor[J]. Opt Eng, 2020, 59(9): 094106. doi: 10.1117/1.OE.59.9.094106
[20] 赵磊. 投影光刻物镜像质补偿策略与补偿技术研究[D]. 长春: 中国科学院大学, 2017.
Zhao L. Imaging performance compensation strategy and compensation technology of lithography lens[D]. Changchun: University of Chinese Academy of Sciences, 2017.
[21] 方超. 光刻物镜系统波像差横向剪切干涉测量研究[D]. 长春: 中国科学院大学, 2018.
Fang C. Research on lateral shearing interferometry in measurement of wavefront aberration of lithography lens[D]. Changchun: University of Chinese Academy of Sciences, 2018.
[22] 方超, 向阳, 齐克奇. 抑制零级串扰的光栅横向剪切干涉测量[J]. 中国激光, 2018, 45(5): 0504002. doi: 10.3788/CJL201845.0504002
Fang C, Xiang Y, Qi K Q. Grating lateral shearing interferometry for suppressing zero-order crosstalk[J]. Chin J Lasers, 2018, 45(5): 0504002. doi: 10.3788/CJL201845.0504002
[23] Chao F, Yang X, Qi K Q. A general method of designing phase-shifting algorithms for grating lateral shearing interferometry[J]. Front Inform Technol Electron Eng, 2018, 19(6): 809−814. doi: 10.1631/FITEE.1601692
[24] Gu H, Zhao Z Y, Zhang Z G, et al. High-precision wavefront reconstruction from Shack-Hartmann wavefront sensor data by a deep convolutional neural network[J]. Measur Sci Technol, 2021, 32(8): 085101. doi: 10.1088/1361-6501/abf708
[25] Hu S W, Hu L J, Gong W, et al. Deep learning based wavefront sensor for complex wavefront detection in adaptive optical microscopes[J]. Front Inform Technol Electron Eng, 2021, 22(10): 1277−1288. doi: 10.1631/FITEE.2000422
[26] Quan H Y, Hou X, Wu F, et al. Absolute measurement of optical flats based on basic iterative methods[J]. Opt Express, 2015, 23(12): 16305−16319. doi: 10.1364/OE.23.016305
[27] 张帅, 全海洋, 侯溪, 等. 基于改进六步翻转法的平行平板面形及均匀性绝对检测方法[J]. 光电工程, 2021, 48(7): 210047.
Zhang S, Quan H Y, Hou X, et al. Absolute testing of planarity and inhomogeneity with modified six-step method[J]. Opto-Electron Eng, 2021, 48(7): 210047.
[28] 侯溪, 张帅, 胡小川, 等. 超高精度面形干涉检测技术进展[J]. 光电工程, 2020, 47(8): 200209. doi: 10.12086/oee.2020.200209
Hou X, Zhang S, Hu X C, et al. The research progress of surface interferometric measurement with higher accuracy[J]. Opto-Electron Eng, 2020, 47(8): 200209. doi: 10.12086/oee.2020.200209
[29] Neal R M, Wyant J C. Polarization phase-shifting point-diffraction interferometer[J]. Appl Opt, 2006, 45(15): 3463−3476. doi: 10.1364/AO.45.003463
[30] Bueno J M, Acosta E, Schwarz C, et al. Wavefront measurements of phase plates combining a point-diffraction interferometer and a Hartmann-Shack sensor[J]. Appl Opt, 2010, 49(3): 450−456. doi: 10.1364/AO.49.000450
[31] Zhou X, Guo R H, Zhu W H, et al. Dynamic wavefront measurement with a pinhole linear polarizer point-diffraction interferometer[J]. Appl Opt, 2017, 56(29): 8040−8047. doi: 10.1364/AO.56.008040
[32] 于长淞, 向阳. 点衍射干涉仪小孔掩模技术研究进展[J]. 激光与光电子学进展, 2013, 50(3): 030004. doi: 10.3788/LOP50.030004
Yu C S, Xiang Y. Research progress of pinhole mask technology of point diffraction interferometer[J]. Laser Optoelectr Progr, 2013, 50(3): 030004. doi: 10.3788/LOP50.030004
[33] Sun Y, Shen H, Li X, et al. Wavelength-tuning point diffraction interferometer resisting inconsistent light intensity and environmental vibration: application to high-precision measurement of a large-aperture spherical surface[J]. Appl Opt, 2019, 58(5): 1253−1260. doi: 10.1364/AO.58.001253
[34] 许伟才. 投影光刻物镜的光学设计与像质补偿[D]. 长春: 中国科学院研究生院, 2011.
Xu W C. Optical design and imaging performance compensation for the lithographic lens[D]. Changchun: University of Chinese Academy of Sciences, 2011.
[35] Dirksen P, Braat J J M, Janssen A J E M, et al. Aerial image based lens metrology for wafer steppers[J]. Proc SPIE, 2006, 6154: 61540X. doi: 10.1117/12.659428
[36] Hartmann J. Bemerkungen uber den bau und die justirung von spektrographen[J]. Zt Instrumentenkd, 1900, 20: 47.
[37] Shack P, Platt B. Production and use of a Lenticular hartmann screen[J]. J Opt Soc Am, 1971, 61(5): 656−661.
[38] Campbell H I, Greenaway A H. Wavefront sensing: from historical roots to the State-of-the-Art[J]. Eas Publicat Ser, 2006, 22: 165−185. doi: 10.1051/eas:2006131
[39] Fujii T, Kougo J, Mizuno Y, et al. Portable phase measuring interferometer using Shack-Hartmann method[J]. Proc SPIE, 2003, 5038: 726−732. doi: 10.1117/12.482699
[40] Schreiber H, Bruning J H. Phase shifting interferometry[M]//Malacara D. Optical Shop Testing. Hoboken: John Wiley & Sons, Inc., 1992.
[41] 陈小君. 近场光强分布对四波横向剪切干涉仪波前复原的影响研究[D]. 成都: 中国科学院大学, 2019.
Chen X J. Study on the influence of intensity distribution on wavefront reconstruction by quadri-wave lateral shearing interferometers[D]. Chengdu: University of Chinese Academy of Sciences, 2019.
[42] Van De Kerkhof M, Jan Voogd R, Schasfoort A, et al. Diffuser concepts for in-situ wavefront measurements of EUV projection optics[J]. Proc SPIE, 2018, 10583: 105830S.
[43] Linnik V P. Simple interferometer for the investigation of optical systems[J]. Proc Acad Sci USSR, 1933, 1: 208−210.
[44] Smart R N, Strong J. Point-diffraction interferometer[J]. Opt J Soc Am, 1972, 62: 737.
[45] Medecki H, Tejnil E, Goldberg K A, et al. Phase-shifting point diffraction interferometer[J]. Opt Lett, 1996, 21(19): 1526−1528. doi: 10.1364/OL.21.001526
[46] 李瑶, 杨甬英, 王晨, 等. 点衍射干涉检测技术[J]. 中国光学, 2017, 10(4): 391−414. doi: 10.3788/co.20171004.0391
Li Y, Yang Y Y, Wang C, et al. Point diffraction in terference detection technology[J]. Chin Opt, 2017, 10(4): 391−414. doi: 10.3788/co.20171004.0391
[47] 杨甬英, 凌瞳. 新型共路干涉仪[M]. 杭州: 浙江大学出版社, 2020.
Yang Y Y, Ling T. Novel Common-Path Interferometers[M]. Hangzhou: Zhejiang University Press, 2020.
[48] Freischlad K R. Absolute interferometric testing based on reconstruction of rotational shear[J]. Appl Opt, 2001, 40(10): 1637−1648. doi: 10.1364/AO.40.001637
[49] Schulz G, Schwider J. IV interferometric testing of smooth surfaces[J]. Progr Opt, 1976, 13: 93−167. doi: 10.1016/S0079-6638(08)70020-9
[50] Schulz G, Schwider J, Hiller C, et al. Establishing an optical flatness standard[J]. Appl Opt, 1971, 10(4): 929−934. doi: 10.1364/AO.10.000929
[51] Harris J S. The universal Fizeau interferometer[D]. Reading: University of Reading, 1971.
[52] Jensen A E. Absolute calibration method for laser Twyman-Green wave front testing interferometers[J]. Opt J Soc Am, 1973, 63: 1313A. doi: 10.1364/OFT.2006.OFTuB3
[53] Selberg L A. Absolute testing of spherical surfaces[J]. Opt Fabricat Test OSA Techn Digest Ser, 1994, 13: 181−184.
[54] Bloemhof E E. Absolute surface metrology by differencing spatially shifted maps from a phase-shifting interferometer[J]. Opt Lett, 2010, 35(14): 2346−2348. doi: 10.1364/OL.35.002346
[55] Soons J A, Griesmann U. Absolute interferometric tests of spherical surfaces based on rotational and translational shears[J]. Proc SPIE, 2012, 8493: 84930G. doi: 10.1117/12.930030
[56] Su D Q, Miao E L, Sui Y X, et al. Absolute surface figure testing by shift-rotation method using Zernike polynomials[J]. Opt Lett, 2012, 37(15): 3198−3200. doi: 10.1364/OL.37.003198
[57] Wang W B, Liu P F, Xing Y L, et al. Error correction for rotationally asymmetric surface deviation testing based on rotational shears[J]. Appl Opt, 2016, 55(26): 7428−7433. doi: 10.1364/AO.55.007428
[58] Wang W B, Zhang M Q, Yan S W, et al. Absolute spherical surface metrology by differencing rotation maps[J]. Appl Opt, 2015, 54(20): 6186−6189. doi: 10.1364/AO.54.006186
[59] Keenan P B. Pseudo-shear interferometry[J]. Proc SPIE, 1983, 429: 2−7. doi: 10.1117/12.936333
[60] Quan H Y, Hou X, Wu G F, et al. Absolute interferometric testing of an ultra-precise flat substrate with a liquid mirror[J]. Proc SPIE, 2019, 11032: 110320J.
[61] Song W H, Hou X, Wu F, et al. Experimental study on absolute measurement of spherical surfaces with shift-rotation method based on Zernike polynomials[J]. Proc SPIE, 2015, 9446: 94463F.
[62] Song W H, Hou X, Wu F, et al. Absolute interferometric shift-rotation method with pixel-level spatial frequency resolution[J]. Opt Lasers Eng, 2014, 54: 68−72. doi: 10.1016/j.optlaseng.2013.10.015
[63] Song W H, Li S F, Hou X, et al. Absolute calibration for Fizeau interferometer with the global optimized shift-rotation method[J]. Opt Lasers Eng, 2014, 54: 49−54. doi: 10.1016/j.optlaseng.2013.10.005
[64] Song W H, Wu F, Hou X, et al. Optimized absolute testing method of shift-rotation[J]. Appl Opt, 2013, 52(28): 7028−7032. doi: 10.1364/AO.52.007028
[65] Yan F T, Fan B, Hou X, et al. Absolute subaperture testing by multiangle averaging and Zernike polynomial fitting method[J]. Opt Eng, 2013, 52(8): 085101. doi: 10.1117/1.OE.52.8.085101
[66] Song W H, Wu F, Hou X, et al. Absolute measurement of flats with the method of shift-rotation[J]. Opt Rev, 2013, 20(5): 374−377. doi: 10.1007/s10043-013-0067-5
[67] Song W H, Wu F, Hou X, et al. Absolute calibration of a spherical reference surface for a Fizeau interferometer with the shift-rotation method of iterative algorithm[J]. Opt Eng, 2013, 52(3): 033601. doi: 10.1117/1.OE.52.3.033601
[68] Song W H, Wu F, Hou X. Experimental study on absolute test of spherical surfaces with shift-rotation method[J]. Proc SPIE, 2012, 8417: 84172A.
[69] Evans C J, Kestner R N. Test optics error removal[J]. Appl Opt, 1996, 35(7): 1015−1021. doi: 10.1364/AO.35.001015
[70] 张艳微. 光学面形的旋转绝对检测技术研究[D]. 长春: 中国科学院大学, 2014.
Zhang Y W. Research on rotational absolute testing of the optical surtace[D]. Changchun: University of Chinese Academy of Sciences, 2014.
[71] Creath K, Wyant J C. Absolute measurement of surface roughness[J]. Appl Opt, 1990, 29(26): 3823−3827. doi: 10.1364/AO.29.003823
[72] Griesmann U, Wang Q D, Soons J, et al. A simple ball averager for reference sphere calibrations[J]. Proc SPIE, 2005, 5869: 58690S. doi: 10.1117/12.614992
[73] 马骅. 球面透镜波前误差的绝对检测方法[D]. 北京: 中国工程物理研究院, 2014.
Ma H. Absolute detection method of wavefront error of spherical lens[D]. Beijing: China Academy of Engineering Physics, 2014.
[74] 苏东奇, 苗二龙, 曲艺, 等. 猫眼法绝对测量干涉仪出射波前[J]. 中国激光, 2015, 42(12): 1208002. doi: 10.3788/CJL201542.1208002
Su D Q, Miao E L, Qu Y, et al. Absolute testing of interferometer wavefront using cat's-eye test[J]. Chin J Lasers, 2015, 42(12): 1208002. doi: 10.3788/CJL201542.1208002
[75] Li P, Tang F, Wang X Z, et al. High NA objective lens wavefront aberration measurement using a cat-eye retroreflector and Zernike polynomial[J]. Opt Express, 2021, 29(20): 31812−31835. doi: 10.1364/OE.437816
[76] Bergner B C, Davies A. Self-calibration for transmitted wavefront measurements[J]. Appl Opt, 2007, 46(1): 18−24. doi: 10.1364/AO.46.000018
[77] Bergner B C, Davies A. Self-calibration technique for transmitted wavefront measurements[J]. Proc SPIE, 2003, 5180: 236−243. doi: 10.1117/12.506408
[78] Fujii T, Suzuki K, Mizuno Y, et al. Integrated projecting optics tester for inspection of immersion ArF scanner[J]. Proc SPIE, 2006, 6152: 615237. doi: 10.1117/12.656025
[79] Li J, Gong Y, Chen H F, et al. Wave-front reconstruction with Hartmann–Shack sensor using a phase-retrieval method[J]. Opt Commun, 2015, 336: 127−133. doi: 10.1016/j.optcom.2014.09.086
[80] Miyakawa R H. Wavefront metrology for High Resolution optical systems[D]. Berkeley: University of California, 2011.
[81] Goldberg K A. Extreme ultraviolet interferometry[D]. Berkeley: University of California, 1997.
[82] 李杰, 王向朝, 唐锋, 等. 光栅剪切干涉仪波像差检测的系统误差的消除方法: CN103674493A[P]. 2014-03-26.
Li J, Wang X C, Tang F, et al. Systematic error elimination method for wave aberration detection by grating shear interferometer: CN103674493A[P]. 2014-03-26.
[83] 李杰, 唐锋, 王向朝, 等. 光栅横向剪切干涉仪及其系统误差分析[J]. 中国激光, 2014, 41(5): 0508006. doi: 10.3788/CJL201441.0508006
Li J, Tang F, Wang X C, et al. System errors analysis of grating lateral shearing interferometer[J]. Chin J Lasers, 2014, 41(5): 0508006. doi: 10.3788/CJL201441.0508006
[84] Li J , Tang F, Wang X Z, et al. Calibration of system errors in lateral shearing interferometer for EUV-wavefront metrology[J]. Proc SPIE, 2015, 9422: 94222O. doi: 10.1117/12.2180265
[85] Creath K, Wyant J C. Testing spherical surfaces: A fast, quasi-absolute technique[J]. Appl Opt, 1992, 31(22): 4350−4354. doi: 10.1364/AO.31.004350
[86] Parks R E. Removal of test optics errors[J]. Proc SPIE, 1978, 153: 56−63. doi: 10.1117/12.938216
[87] Song W H, Wu F, Hou X. Method to test rotationally asymmetric surface deviation with high accuracy[J]. Appl Opt, 2012, 51(22): 5567−5572. doi: 10.1364/AO.51.005567
[88] Song W H, Xi H, Fan W, et al. Comparative analysis of absolute methods to test rotationally asymmetric surface deviation[J]. Proc SPIE, 2013, 8789: 87890Z. doi: 10.1117/12.2018219
[89] Kim S W, Rhee H G. Self-calibration of high frequency errors of test optics by arbitrary N-step rotation[J]. Int J Precis Eng Manufact, 2000, 1(2): 115−123.
[90] Rhee H G, Lee Y W, Kim S W. Azimuthal position error correction algorithm for absolute test of large optical surfaces[J]. Opt Express, 2006, 14(20): 9169−9177. doi: 10.1364/OE.14.009169
[91] Zhang Y W, Su D Q, Li L, et al. Error-immune algorithm for absolute testing of rotationally asymmetric surface deviation[J]. J Opt Soc Korea, 2014, 18(4): 335−340. doi: 10.3807/JOSK.2014.18.4.335
[92] Zhang L, Qi K Q, Xiang Y. Two-step algorithm for removing the rotationally asymmetric systemic errors on grating lateral shearing interferometer[J]. Opt Express, 2018, 26(11): 14267−14277. doi: 10.1364/OE.26.014267
[93] Otaki K, Kohara N, Sugisaki K, et al. Ultra high-precision wavefront metrology using EUV low brightness source[M]//Osten W. Fringe 2013. Berlin: Springer, 2014: 385–392.
[94] Zhu Y C, Sugisaki K, Okada M, et al. Wavefront measurement interferometry at the operational wavelength of extreme-ultraviolet lithography[J]. Appl Opt, 2007, 46(27): 6783−6792. doi: 10.1364/AO.46.006783
[95] 刘克, 李艳秋. 一种新的相移点衍射干涉仪系统误差标定方法[J]. 光学学报, 2010, 30(10): 2923−2927. doi: 10.3788/AOS20103010.2923
Liu K, Li Y Q. A new calibration method of systematic errors in phase-shifting point diffraction interferometer[J]. Acta Opt Sin, 2010, 30(10): 2923−2927. doi: 10.3788/AOS20103010.2923
[96] Sommargren G E. Phase shifting diffraction interferometry for measuring extreme ultraviolet optics[R]. Boston, MA: Lawrence Livermore National Laboratory, 1996.
[97] Matsuura T, Udaka K, Oshikane Y, et al. Spherical concave mirror measurement by phase-shifting point diffraction interferometer with two optical fibers[J]. Nucl Instrum Methods Phys Res Sect A Accelerat Spectro Detect Assoc Equip, 2010, 616(2-3): 233−236. doi: 10.1016/j.nima.2009.12.031
[98] 杨甬英. 先进干涉检测技术与应用[M]. 杭州: 浙江大学出版社, 2017.
Yang Y Y. Advanced Interferometry and Application[M]. Hangzhou: Zhejiang University Press, 2017.
[99] Feng P, Tang F, Wang X Z, et al. Dual-fiber point diffraction interferometer to measure the wavefront aberration of an imaging system[J]. Appl Opt, 2020, 59(10): 3093−3096. doi: 10.1364/AO.387540
-


 E-mail Alert
 RSS
RSS
 下载:
下载:

