-
摘要
提出通过构造光刀平面,采用单应性矩阵的计算方法,完成线结构光系统标定。该方法通过在相机景深范围内平移标定靶,获取不同位置的光刀图像和靶标图像,从同一位置的两幅图中提取出特征点图像,构成一个光刀平面。按照相机针孔成像模型,可以建立光刀平面与相机系统的单应性矩阵关系,并计算出该矩阵,从而完成标定。在测量时,只需根据提取出的光刀图像像素坐标,结合单应性矩阵即可得到待测物体坐标,再结合平移设备,便可完成对整个物体的测量。实验证明,线结构光系统标定最大残差小于0.05 mm,标准差小于0.02 mm,两个面之间的测量距离相对误差低于1.3%。整个系统标定过程简单,适用于快速标定线结构光系统和工业化测量。

Abstract
An easy line-structured light system calibration method is proposed, which is based on the constructed light plane and homography matrix. In this method, the sequential images of the light plane and calibration target are obtained at different positions by shifting a translating target plane within the depth of camera's field, then a series of feature points would be extracted from these images to form a light plane. Then, a homography matrix, which is the mapping relationship between the light plane and the image plane of camera, can be calculated. In the experiment, the 3D data can be obtained by using this homography matrix when image coordinates of the light plane are extracted in an arbitrary image. Then the entire object can be measured by using a translation device. For the real data of calibration, the maximum residual error is less than 0.05 mm, standard deviation is less than 0.02 mm, the relative error of the measured distance between the two planes is less than 1.3%. The proposed method can make the entire calibration process easy and flexible to use.
-
Key words:
- machine vision /
- line-structured light /
- homography matrix /
- calibration /
- light plane
-
Overview

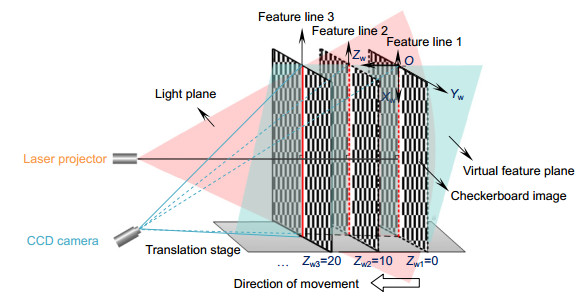
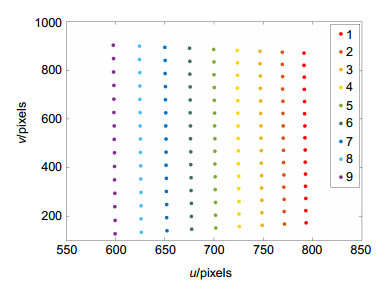
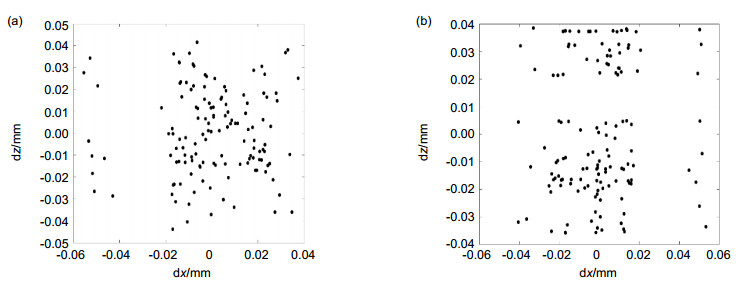
Overview: Among many active vision measuring technologies, three-dimensional (3D) sensing technology based on laser triangulation measurement model has been fully carried out in various fields of applications. When measuring an object, a line-structured light is projected onto the surface of measured object, and camera captures those images which contain height information of the measured object from a certain angle. The process, which is called system calibration, is a key step in the whole 3D measurement and can directly affect the accuracy of measurement. However, the existing calibration methods of line-structured light system involve time-consuming and complicated procedures. To address this issue, this paper presents a practicable calibration method based on a homography matrix as shown in fig, which does not need the camera calibration as well as the calculation of the light plane equation. For system calibration, two corresponding images must be captured at each position, one is with the light stripe which called light plane, the other is without the light stripe e.g. a calibration plane and it will be moved by a translation stage. The light plane is preprocessed by filtering and threshold method, then to extract the pixel coordinates of light stripe center by gray weighted centroid algorithm. And, some error points are removed via maximum likelihood method, and to fit the remaining valid points into a linear equation. The intersection lines are extracted between each light plane and the calibration plane, and a series of intersection lines can be obtained after moving the calibration plane several times to forming a virtual plane, which is the actual light plane. Then the corner feature points are extracted from calibration planes by Harris corner detection algorithm, and fitted the corner feature points into a linear equation. Combining the two linear equations, the extracted image coordinates of feature points are the intersection points of two fitting lines. When the world coordinates of feature points are set, the corresponding relationship between light plane and image plane is represented by the mapping (Homography). To an end, this calibration method only needs to calibrate two or more light planes at different positions. And the maximum residual error is less than 0.05 mm, standard deviation is less than 0.02 mm. The relative error of the measured distance between the two planes is less than 1.3%. The experimental results have demonstrated the feasibility and validity of the proposed method in 3D measurement with simple system calibration procedures. Moreover, the entire calibration process is practicable to simplify the experimental procedures and easy to be applied in industrial inspection.
-

-
表 1 Xw和Zw方向标定精度比较
Table 1. Comparison of calibration accuracy between Xw and Zw directions
Methods The proposed method Ref.[20] Directions Xw direction Zw direction Xw direction Zw direction Maximum residual error/mm 0.0373 0.0416 0.0533 0.0385 Standard deviation/mm 0.0199 0.0197 0.0196 0.0239 表 2 每个面平整度误差
Table 2. Flatness error of each plane
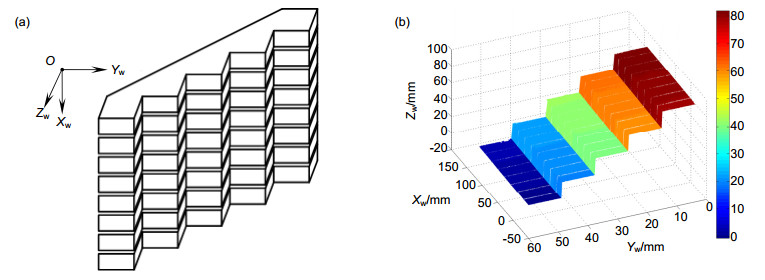
Step No. 1 2 3 4 5 RMS error/mm 0.0481 0.0507 0.0544 0.0570 0.0632 表 3 深度方向测量精度分析
Table 3. Accuracy analysis of depth direction measurement
Distance/mm Reference distance/mm Calculated dis-tance/mm Relative error/% d12 20 19.7499 1.25 d13 40 39.6151 0.96 d14 60 59.4493 0.92 d15 80 79.2831 0.90 d23 20 19.8481 0.76 d24 40 39.6655 0.84 d25 60 59.4820 0.86 d34 20 19.5776 1.05 d35 40 39.5776 1.06 d45 20 19.8218 0.89 -
参考文献
[1] Chen F, Brown G M, Song M M. Overview of three-dimensional shape measurement using optical methods[J]. Optical Engineering, 2000, 39(1): 10–22. doi: 10.1117/1.602438
[2] 李玥华, 周京博, 刘利剑.线结构光测量技术研究进展[J].河北科技大学学报, 2018, 39(2): 115–124. doi: 10.7535/hbkd.2018yx02004
Li Y H, Zhou J B, Liu L J. Research progress of the line structured light measurement technique[J]. Journal of Hebei University of Science and Technology, 2018, 39(2): 115–124. doi: 10.7535/hbkd.2018yx02004
[3] 黄战华, 罗曾, 李莎, 等.激光三角法大量程小夹角位移测量系统的标定方法研究[J].光电工程, 2012, 39(7): 26–30. doi: 10.3969/j.issn.1003-501X.2012.07.004
Huang Z H, Luo Z, Li S, et al. Calibration method of large-arrange small-angle laser triangulation measuring system[J]. Opto-Electronic Engineering, 2012, 39(7): 26–30. doi: 10.3969/j.issn.1003-501X.2012.07.004
[4] 黄潜, 王泽勇, 李金龙, 等.基于三维扫描的机车走行部螺栓识别与定位[J].光电工程, 2018, 45(1): 170532. doi: 10.12086/oee.2018.170532
Huang Q, Wang Z Y, Li J L, et al. Automatic recognition of bolts on locomotive running gear based on laser scanner 3D measurement[J]. Opto-Electronic Engineering, 2018, 45(1): 170532. doi: 10.12086/oee.2018.170532
[5] 吴开华, 王文杰.植保无人机结构光视觉的障碍物检测方法[J].光电工程, 2018, 45(4): 170613. doi: 10.12086/oee.2018.170613
Wu K H, Wang W J. Detection method of obstacle for plant protection UAV based on structured light vision[J]. Opto-Electronic Engineering, 2018, 45(4): 170613. doi: 10.12086/oee.2018.170613
[6] Wei Z Z, Li C Q, Ding B S. Line structured light vision sensor calibration using parallel straight lines features[J]. Optik, 2014, 125(17): 4990–4997. doi: 10.1016/j.ijleo.2014.04.004
[7] 杨浩, 蔡宁, 林斌, 等.适用于离焦状态相机的相位编码标定方法[J].光电工程, 2018, 45(7): 180100. doi: 10.12086/oee.2018.180100
Yang H, Cai N, Lin B, et al. Camera calibration method based on phase encoding for out-of-focus condition[J]. Opto-Electronic Engineering, 2018, 45(7): 180100. doi: 10.12086/oee.2018.180100
[8] Zhang Z Y. A flexible new technique for camera calibration[J]. IEEE Transactions on Pattern Analysis and Machine Intelligence, 2000, 22(11): 1330–1334. doi: 10.1109/34.888718
[9] 崔希民, 李聪, 袁德宝, 等.基于拉丝法的线结构光视觉测量系统标定[J].科技导报, 2014, 32(24): 64–67. doi: 10.3981/j.issn.1000-7857.2014.24.010
Cui X M, Li C, Yuan D B, et al. Calibration of a line structured light vision measuring system based on the drawing method[J]. Science & Technology Review, 2014, 32(24): 64–67. doi: 10.3981/j.issn.1000-7857.2014.24.010
[10] 段发阶, 刘凤梅, 叶声华.一种新型线结构光传感器结构参数标定方法[J].仪器仪表学报, 2000, 21(1): 108–110. doi: 10.3321/j.issn:0254-3087.2000.01.032
Duan F J, Liu F M, Ye S H. A new accurate method for the calibration of line structured light sensor[J]. Chinese Journal of Scientific Instrument, 2000, 21(1): 108–110. doi: 10.3321/j.issn:0254-3087.2000.01.032
[11] 陈天飞, 赵吉宾, 吴翔.基于共面靶标的线结构光传感器标定新方法[J].光学学报, 2015, 35(1): 0112004. doi: 10.3788/AOS201535.0112004
Chen T F, Zhao J B, Wu X. New calibration method for line structured light sensor based on planar target[J]. Acta Optica Sinica, 2015, 35(1): 0112004. doi: 10.3788/AOS201535.0112004
[12] Wei Z Z, Shao M W, Zhang G J, et al. Parallel-based calibration method for line-structured light vision sensor[J]. Optical Engineering, 2014, 53(3): 033101. doi: 10.1117/1.OE.53.3.033101
[13] 张广军, 魏振忠, 孙志武, 等.基于BP神经网络的结构光三维视觉检测方法研究[J].仪器仪表学报, 2002, 23(1): 31–35. doi: 10.3321/j.issn:0254-3087.2002.01.008
Zhang G J, Wei Z Z, Sun Z W, et al. A method of structured light based 3D vision inspection using BP neural network[J]. Chinese Journal of Scientific Instrument, 2002, 23(1): 31–35. doi: 10.3321/j.issn:0254-3087.2002.01.008
[14] Zhao H J, Shi S G, Jiang H Z, et al. Calibration of AOTF-based 3D measurement system using multiplane model based on phase fringe and BP neural network[J]. Optics Express, 2017, 25(9): 10413–10433. doi: 10.1364/OE.25.010413
[15] Dipanda A, Woo S, Marzani F, et al. 3-D shape reconstruction in an active stereo vision system using genetic algorithms[J]. Pattern Recognition, 2003, 36(9): 2143–2159. doi: 10.1016/S0031-3203(03)00049-9
[16] Sun Y J, Zhang X F, Jian M W, et al. An improved genetic algorithm for three-dimensional reconstruction from a single uniform texture image[J]. Soft Computing, 2018, 22(2): 477–486. doi: 10.1007/s00500-016-2348-y
[17] 邹媛媛, 李鹏飞, 左克铸.三线结构光视觉传感器现场标定方法[J].红外与激光工程, 2018, 47(6): 617002. doi: 10.3788/IRLA201847.0617002
Zou Y Y, Li P F, Zuo K Z. Field calibration method for three-line structured light vision sensor[J]. Infrared and Laser Engineering, 2018, 47(6): 617002. doi: 10.3788/IRLA201847.0617002
[18] 甘宏, 张超, 李林, 等.复杂背景下激光条纹中心亚像素提取方法[J].光电工程, 2019, 46(2): 180457. doi: 10.12086/oee.2019.180457
Gan H, Zhang C, Li L, et al. Sub-pixel extraction of laser stripe in complex background[J]. Opto-Electronic Engineering, 2019, 46(2): 180457. doi: 10.12086/oee.2019.180457
[19] Harris C, Stephens M. A combined corner and edge detector[C]// Proceedings of the 4th Alvey Vision Conference, 1988: 147–151.
[20] 张启灿, 苏显渝, 邹小平.多个线结构光传感器三维测量系统的校准[J].激光技术, 2005, 29(3): 225–227, 232. doi: 10.3969/j.issn.1001-3806.2005.03.021
Zhang Q C, Su X Y, Zou X P. Calibration of 3-D measurement system using multi-sensor with line structured-illuminated laser[J]. Laser Technology, 2005, 29(3): 225–227, 232. doi: 10.3969/j.issn.1001-3806.2005.03.021
-
访问统计


 E-mail Alert
 RSS
RSS

 下载:
下载:
